
 AsyaTicari
 AsyaRestoran
 AsyaOtel
 AsyaCrm
 AsyaKlinik
 AsyaSpor
 AsyaSSH
 AsyaEmlak
 AsyaFilo
 AsyaPuantaj
 AsyaİSG
 AsyaİHD
 Kolay Öğren
Shared modules · Settings
Control panel
Company information, general ledger, password rule, number format, exchange rate usage, integrations (e-documents, fiscal cash register, cargo …), code template types, commerce preferences and company features.
This screen changed recently. Screenshots will be retaken after the code change of 2026-11-19; the text is current, some images may look outdated.
The Control panel gathers all general company settings on a single page. Settings are split into collapsible panels; each panel is saved separately with its own Save button. The screen is visible to the company administrator or users with the settings permission.
Opening the screen
Open Settings → Control panel from the side menu. The tabs at the top (Overview, Workplaces, Users, Permissions, Calendar Management, Subscription cart) switch to the other settings screens.
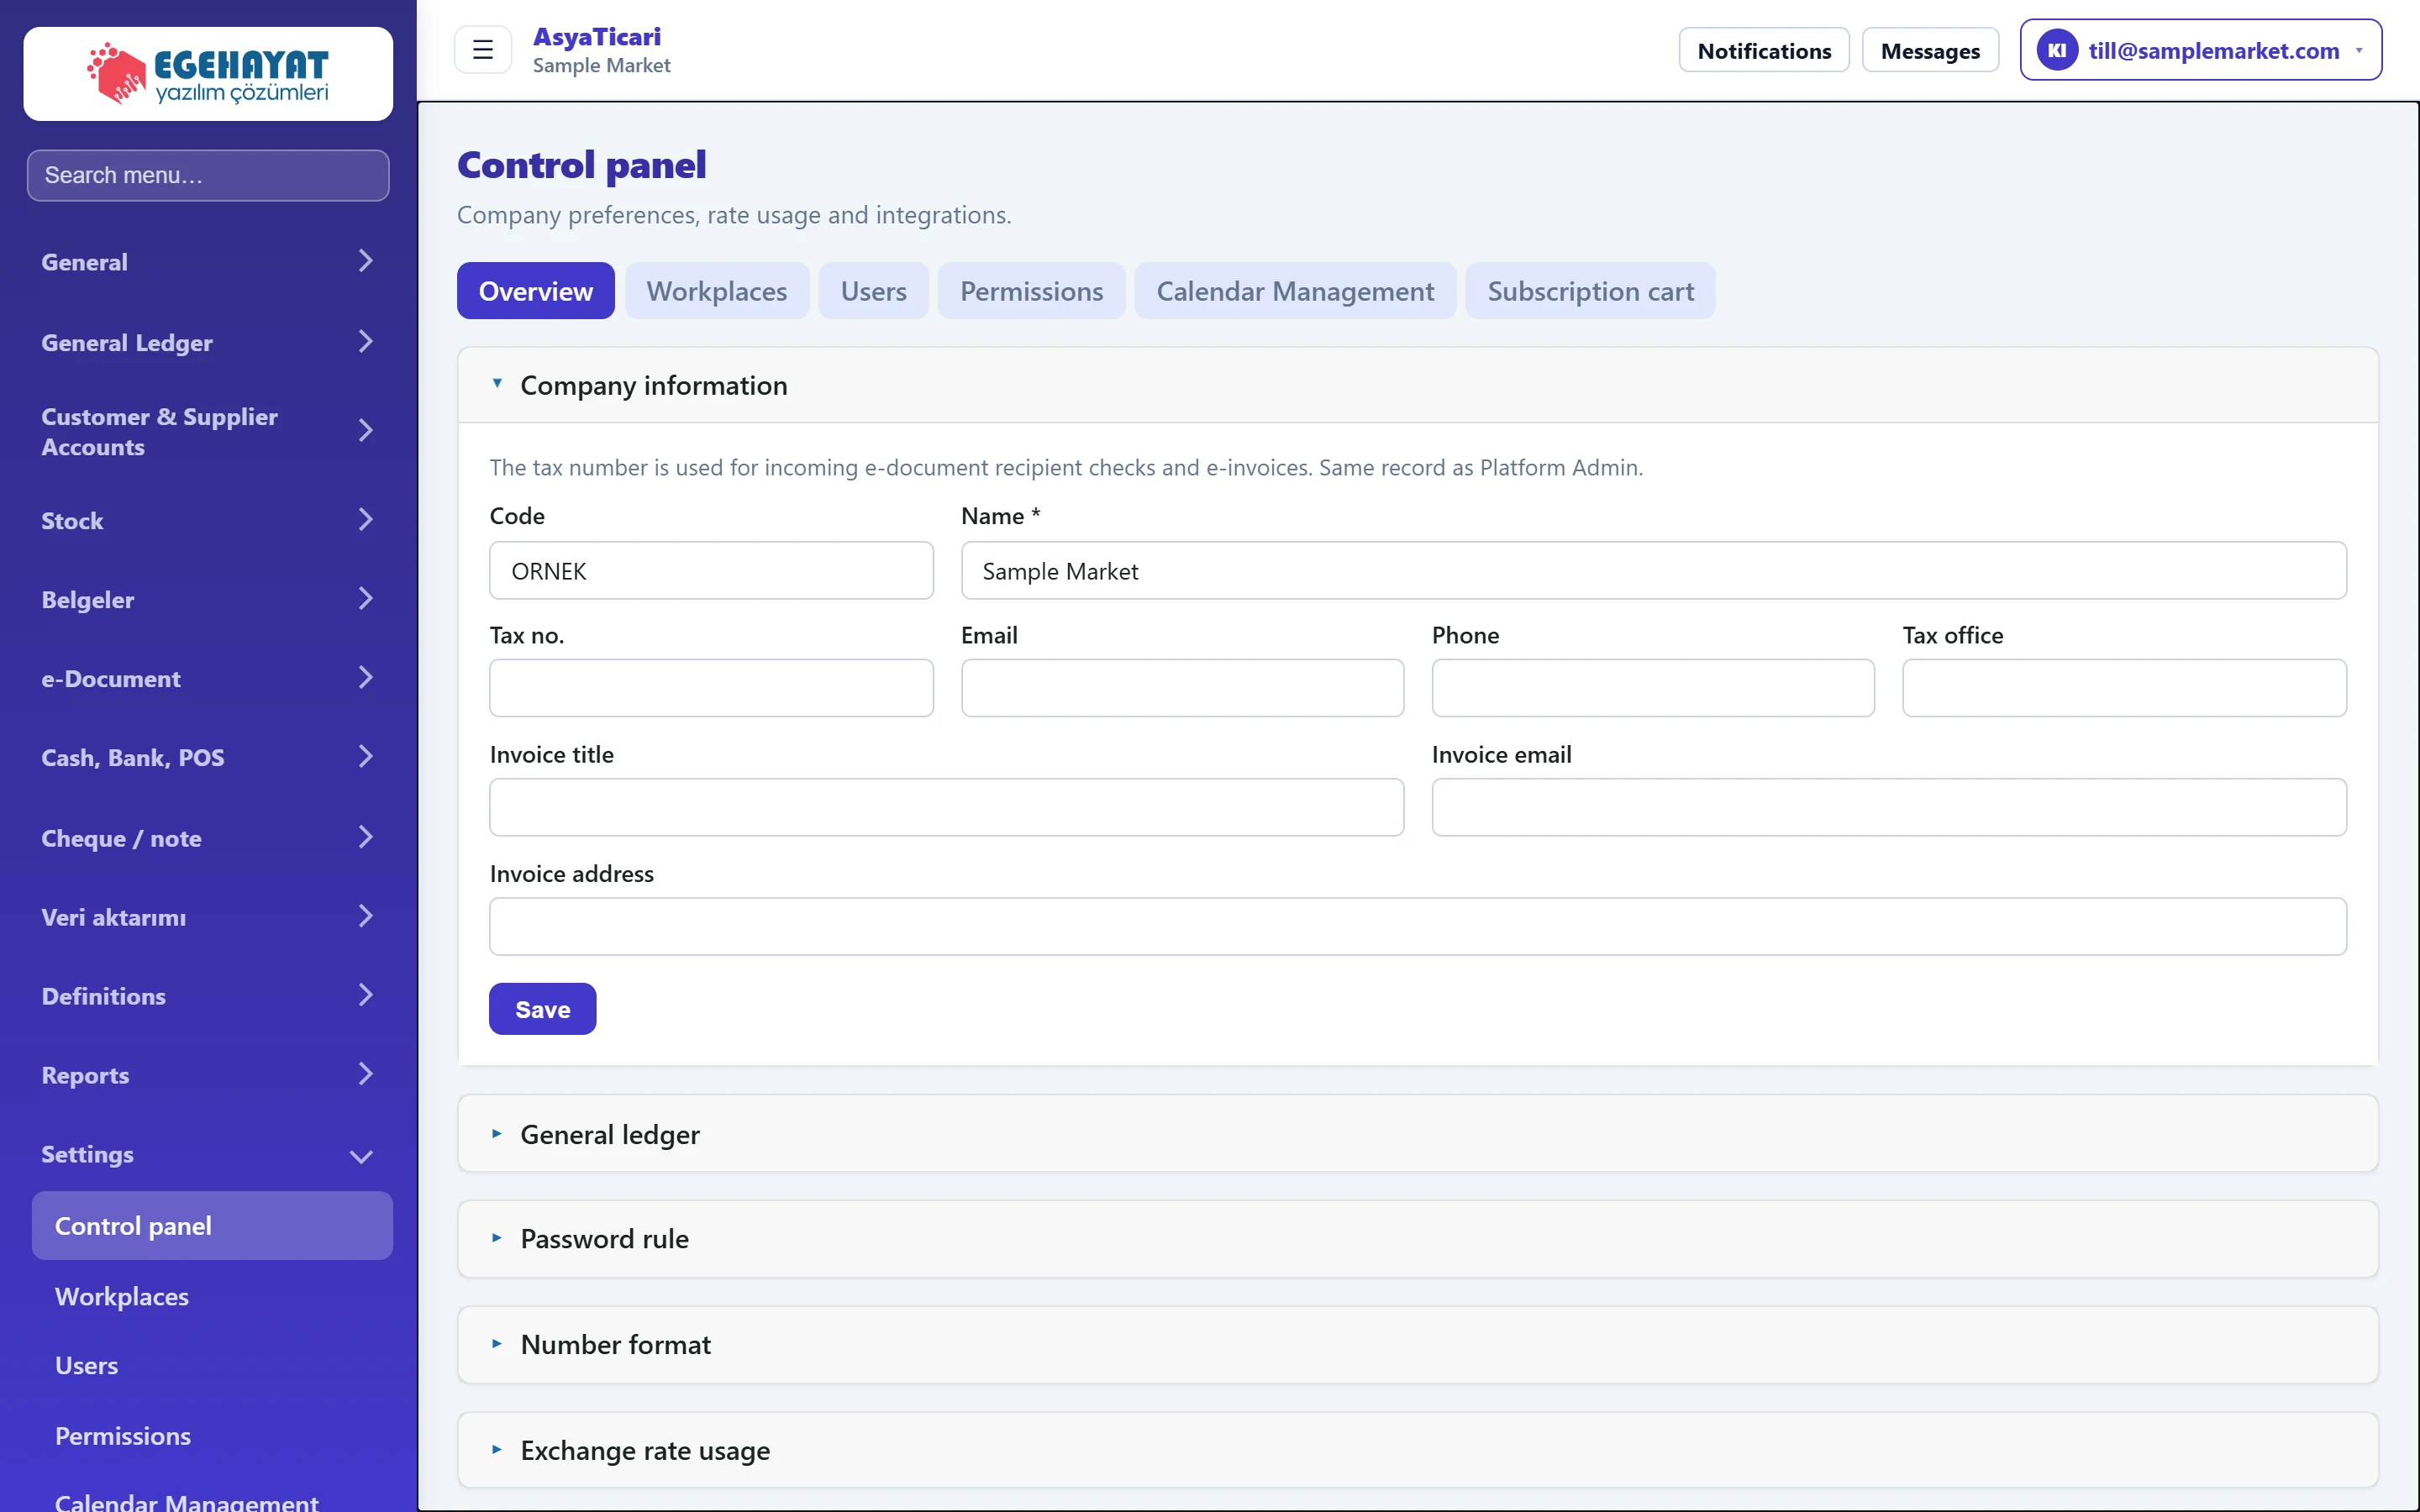
- 1Settings tabs Switch between Overview (Control panel), Workplaces, Users, Permissions, Calendar management and Subscription cart.
- 2Company information Collapsible panel header: click to open / close the panel.
- 3Save Saves only the changes in this panel.
- 4General ledger Other settings panels; each works with its own Save button.
If you change something in one panel and move on without pressing Save, the change is lost when the page is reloaded. Save each panel separately.
Company information
The company's name, tax details and invoice details. This record is the same as the company record in Platform Admin; a change in one appears in the other.
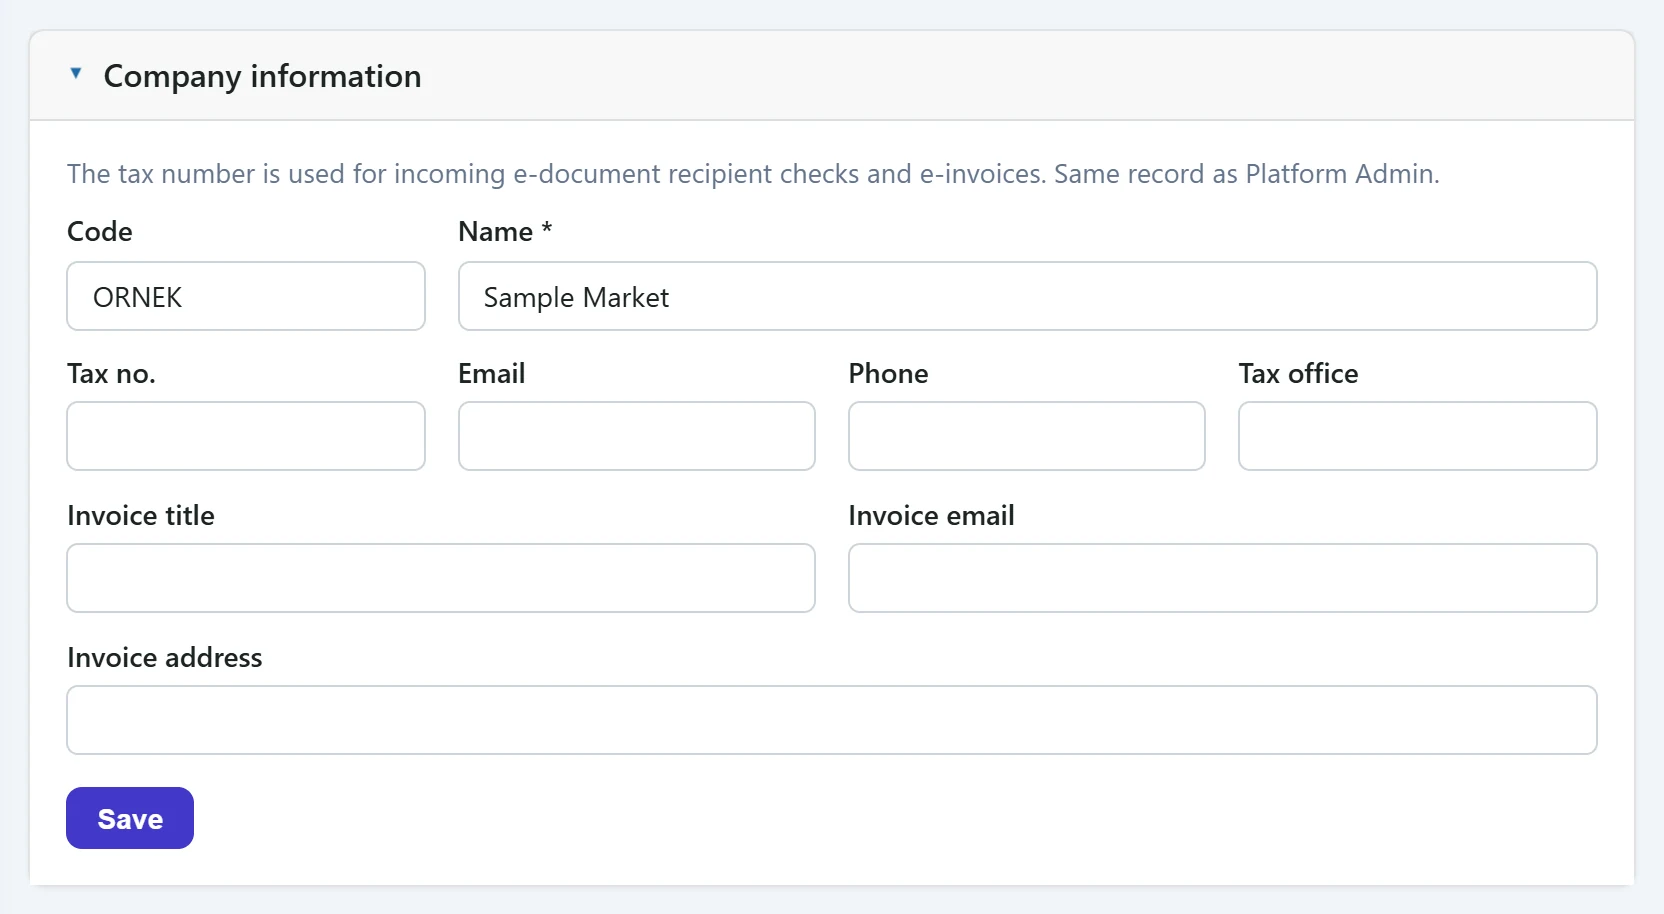
- 1Code Read-only.
- 2Tax no. Used for e-invoices and checking incoming e-documents.
- 3Save Saves the company information.
| Field | Sign in | Description |
|---|---|---|
| Code | Text | Company code. Assigned by the platform; cannot be changed here. |
| Name required | Text | Display name of the company. Required; the record is not saved if it is empty. |
| Tax no. | Text | 10-digit tax number or 11-digit Turkish ID number. Used for sending e-invoices and checking the recipient of incoming e-documents. |
| Text | General e-mail address of the company. | |
| Phone | Text | General phone number of the company. |
| Tax office | Text | The tax office the company belongs to. |
| Invoice title | Text | Official title shown on invoices (e.g. «Sample Foods Ltd.»). If empty, the company name is used. |
| Invoice email | Text | Address that receives invoice and e-document notifications. |
| Invoice address | Text | Full address printed on invoices. |
The tax number is used when sending e-invoices and to check that incoming e-documents belong to you. If it is wrong, e-documents may be rejected.
General ledger
Turns on the official accounting module (chart of accounts, journal vouchers, trial balance, sub-ledger, journal book, period operations). The default is Off. This panel is visible only to the company administrator.
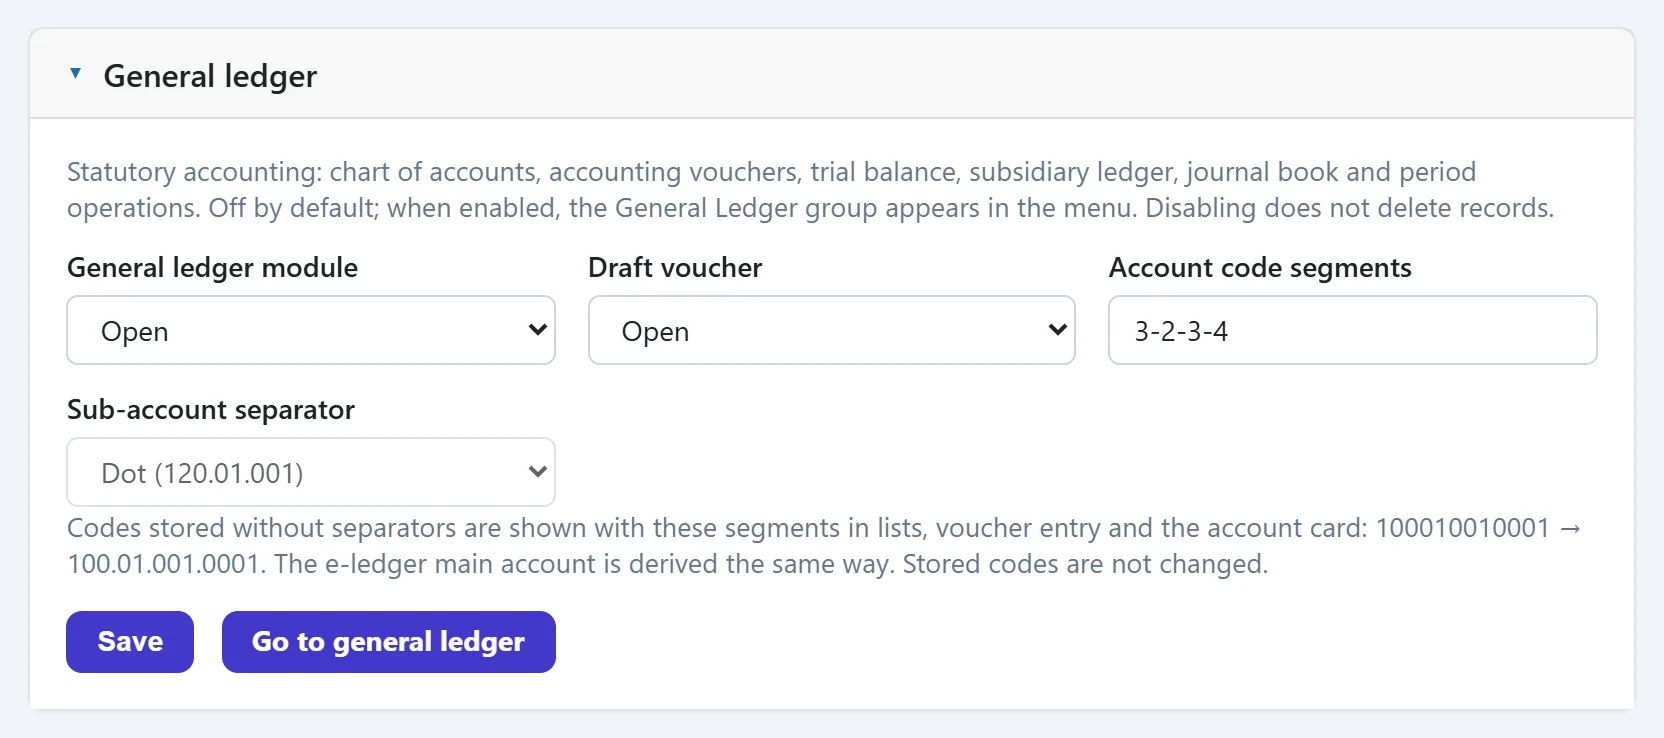
- 1General ledger module On / Off.
- 2Save Saves the setting.
- 3Go to general ledger When the module is on, goes to the journal vouchers screen.
| Field | Sign in | Description |
|---|---|---|
| General ledger module | Choice list | Once set to On and saved, the General Ledger group appears in the menu. Turning it off does not delete records. Options: Closed · Open |
| Draft voucher | Choice list | When on, journal vouchers can be saved as drafts; drafts are not included in the trial balance. Options: Open · Closed |
| Account code segments | Text | Number of digits in each part of the account code, separated by dashes (e.g. 3-2-3-4). The first part must be 3. Placeholder: «3-2-3-4» |
| Sub-account separator | Choice list | Separator between account code parts: dot, dash or space. Cannot be changed once sub-accounts exist. Options: Dot (120.01.001) · Hyphen (120-01-001) · Space (120 01 001) |
To turn on the general ledger:
- Select On in General ledger module.
- If needed, change the account code digits and the sub-account separator (e.g. 3-2-3-4 and dot → 100.01.001.0001).
- Press Save. A message says the general ledger is on and the page should be refreshed for the menu.
- If the chart of accounts is empty, a button to load the Uniform Chart of Accounts appears in the panel; it loads the standard chart.
- Refresh the page; the General Ledger group appears in the side menu. The Go to general ledger button also leads straight to the journal vouchers.
The sub-account separator cannot be changed once sub-accounts exist. Decide on the separator and digits before you start using the module.
Password rule
Chooses which rule applies when a new password is given to the company's users or a password is changed. The default is Complex. Only the company administrator sees this panel; the same setting is also in the company details in Platform Admin.
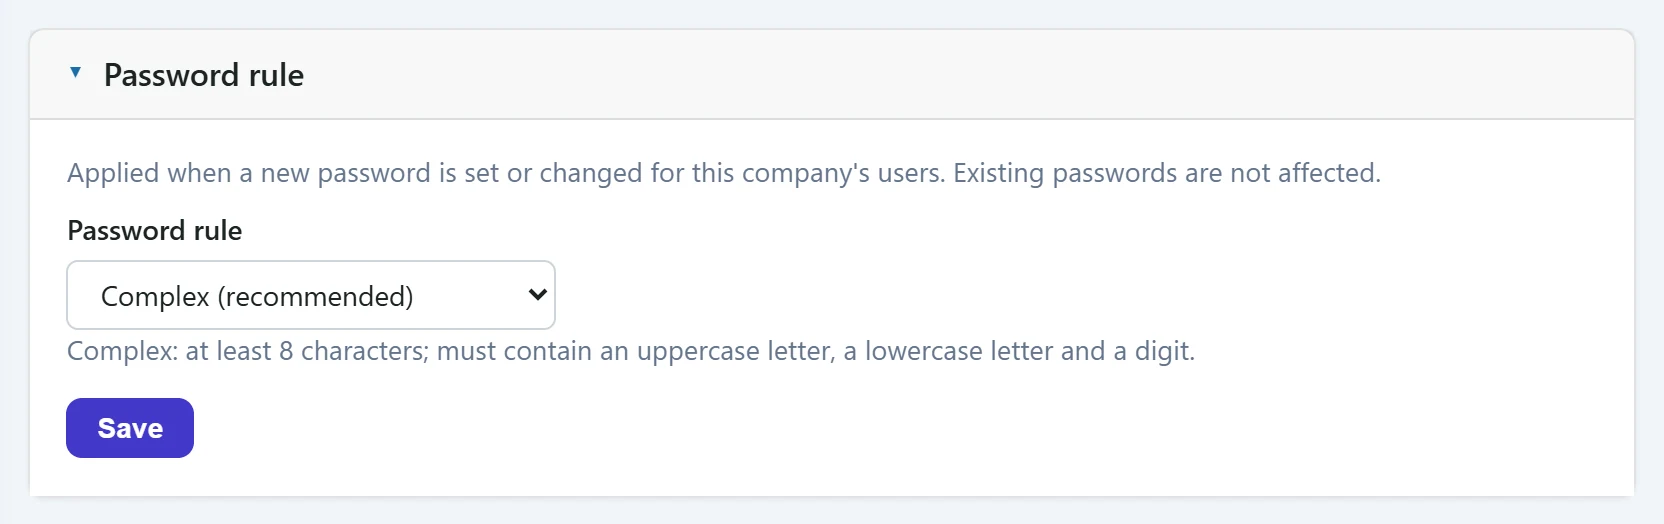
- 1Password rule Complex / Simple.
- 2Save Saves the setting.
| Field | Sign in | Description |
|---|---|---|
| Password rule | Choice list | Complex (recommended): at least 8 characters with an uppercase letter, a lowercase letter and a digit. Simple: at least 4 characters. Applies only to newly set or changed passwords. Options: Complex (recommended) · Simple |
- Complex (recommended): at least 8 characters with an upper-case letter, a lower-case letter and a digit.
- Simple: at least 4 characters; no upper-case or digit required.
Choose the rule and press Save; the message «Password rule saved.» appears.
Existing passwords do not change; the rule applies only to newly given or changed passwords. If a user works in more than one company, the strictest rule applies.
Number format
How many decimal places are shown and entered for amounts, prices, quantities and rates. An example of the chosen format appears under each box. Rounding of document totals is not affected.
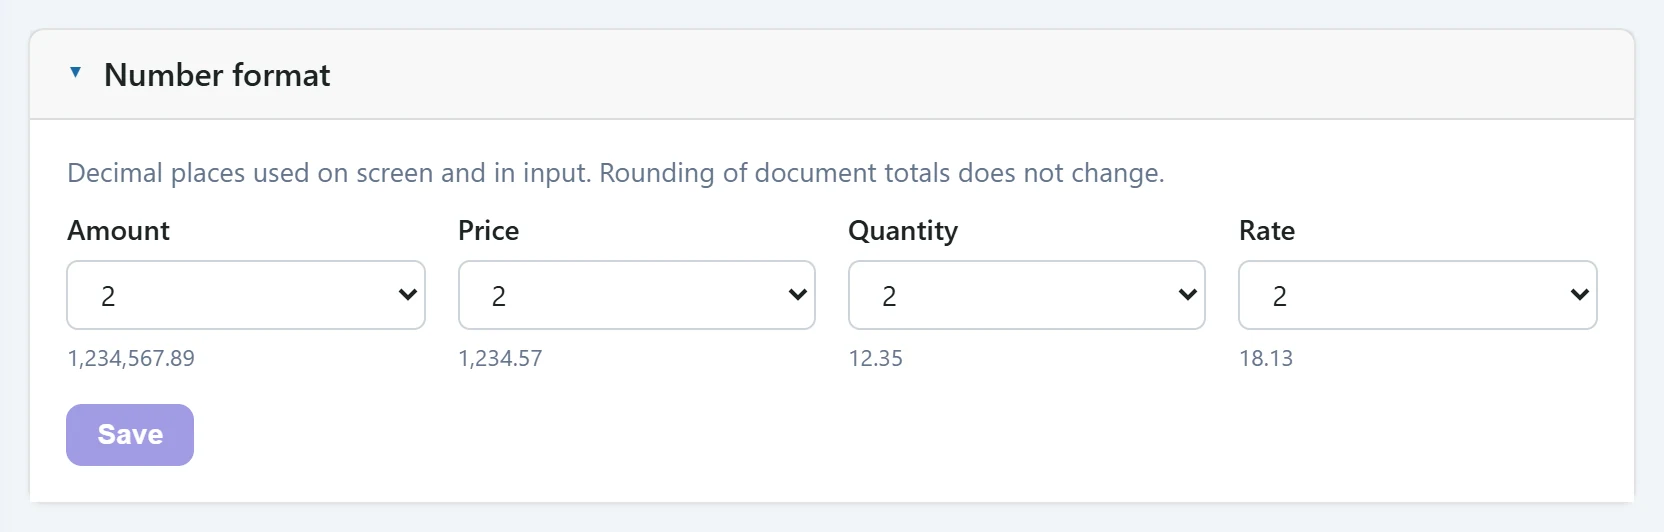
- 1Amount A sample number for the selection appears below.
- 2Save Disabled when there are no changes.
| Field | Sign in | Description |
|---|---|---|
| Amount | Choice list | Decimal places shown for amounts (0–2). Options: 0 · 1 · 2 |
| Price | Choice list | Decimal places for unit prices (0–4). Options: 0 · 1 · 2 · 3 · 4 |
| Quantity | Choice list | Decimal places for quantities (0–4); e.g. 3 when selling by kg. Options: 0 · 1 · 2 · 3 · 4 |
| Rate | Choice list | Decimal places for percentages and rates (0–4). Options: 0 · 1 · 2 · 3 · 4 |
Exchange rate usage
Which day and which rate type are used on foreign-currency documents. If the document date falls on a holiday or weekend, the previous business day's rate is used (the business day is determined by the calendar in Calendar Management).
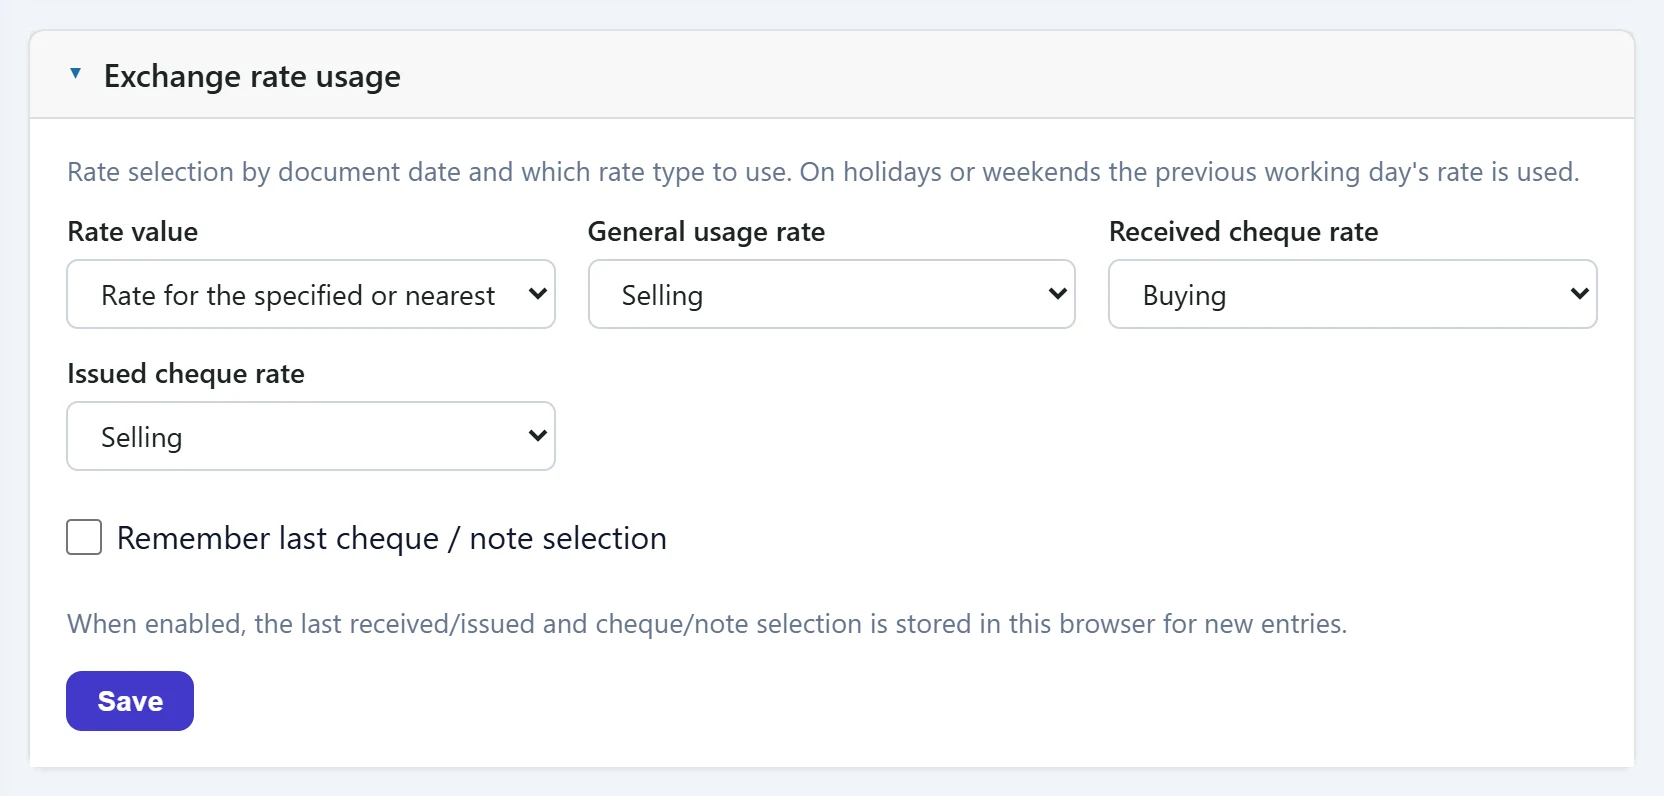
- 1Rate value Which day's rate is used on holidays / weekends.
- 2Save Saves the exchange rate preferences.
| Field | Sign in | Description |
|---|---|---|
| Rate value | Choice list | What to do when there is no rate on the document date: nearest business day, that date only, or previous business day. Options: Rate for the specified or nearest working day · Rate for the specified date only · Rate for the given or previous business day |
| General usage rate | Choice list | Default rate type for foreign-currency documents (buying, selling, banknote buying, banknote selling). Options: Buying · Selling · Cash purchase · Cash sale |
| Received cheque rate | Choice list | Rate type for foreign-currency cheques / notes received from customers. Options: Buying · Selling · Cash purchase · Cash sale |
| Issued cheque rate | Choice list | Rate type for foreign-currency cheques / notes issued to suppliers. Options: Buying · Selling · Cash purchase · Cash sale |
| Remember last cheque / note selection | Checkbox | If ticked, the last direction and type you chose for a new cheque / note are remembered in this browser. |
Integrations
Connections to external systems are in separate panels. Each panel has a provider list; while Not integrated is selected the application works as before and nothing is sent outside. Selecting a provider opens that provider's required fields. Connected panels show the active provider's name on the right of the header.
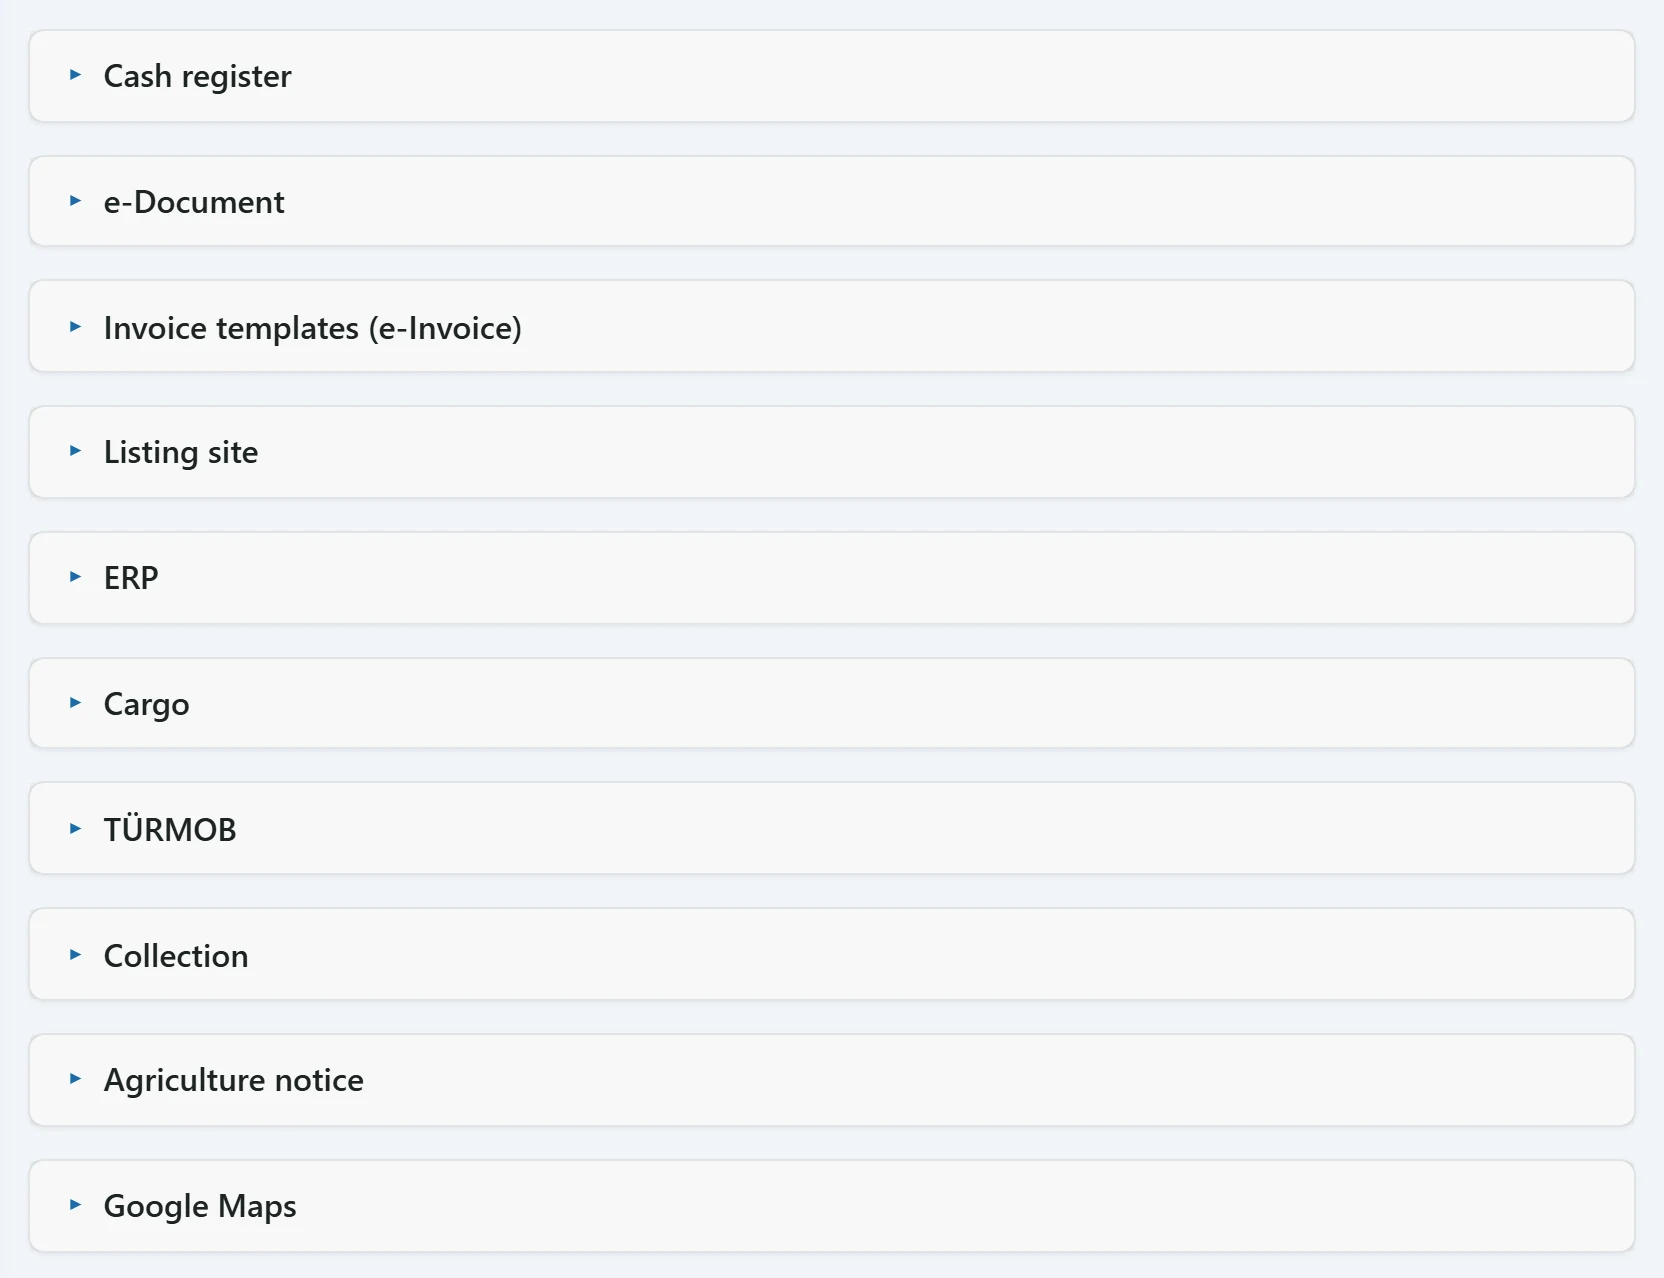
- 1Fiscal cash register Connection to a fiscal cash register device (e.g. Pavo).
- 2e-Document e-Invoice, e-Archive and e-Waybill provider.
- 3Invoice designs (e-Document) XSLT designs for the look of e-documents.
- 4Listing site Store connection to a listing site.
- 5ERP Transfer to Mikro, Netsis or Live ERP.
- 6Shipping Shipment notification to the cargo company.
- 7TÜRMOB Taxpayer lookup on the account card.
- 8Online payments Online payment collection with PayTR / iyzico.
- 9Agriculture reporting BKST / GTS notifications.
- 10Google Maps Key for the address map and road distance.
Connecting an e-document provider
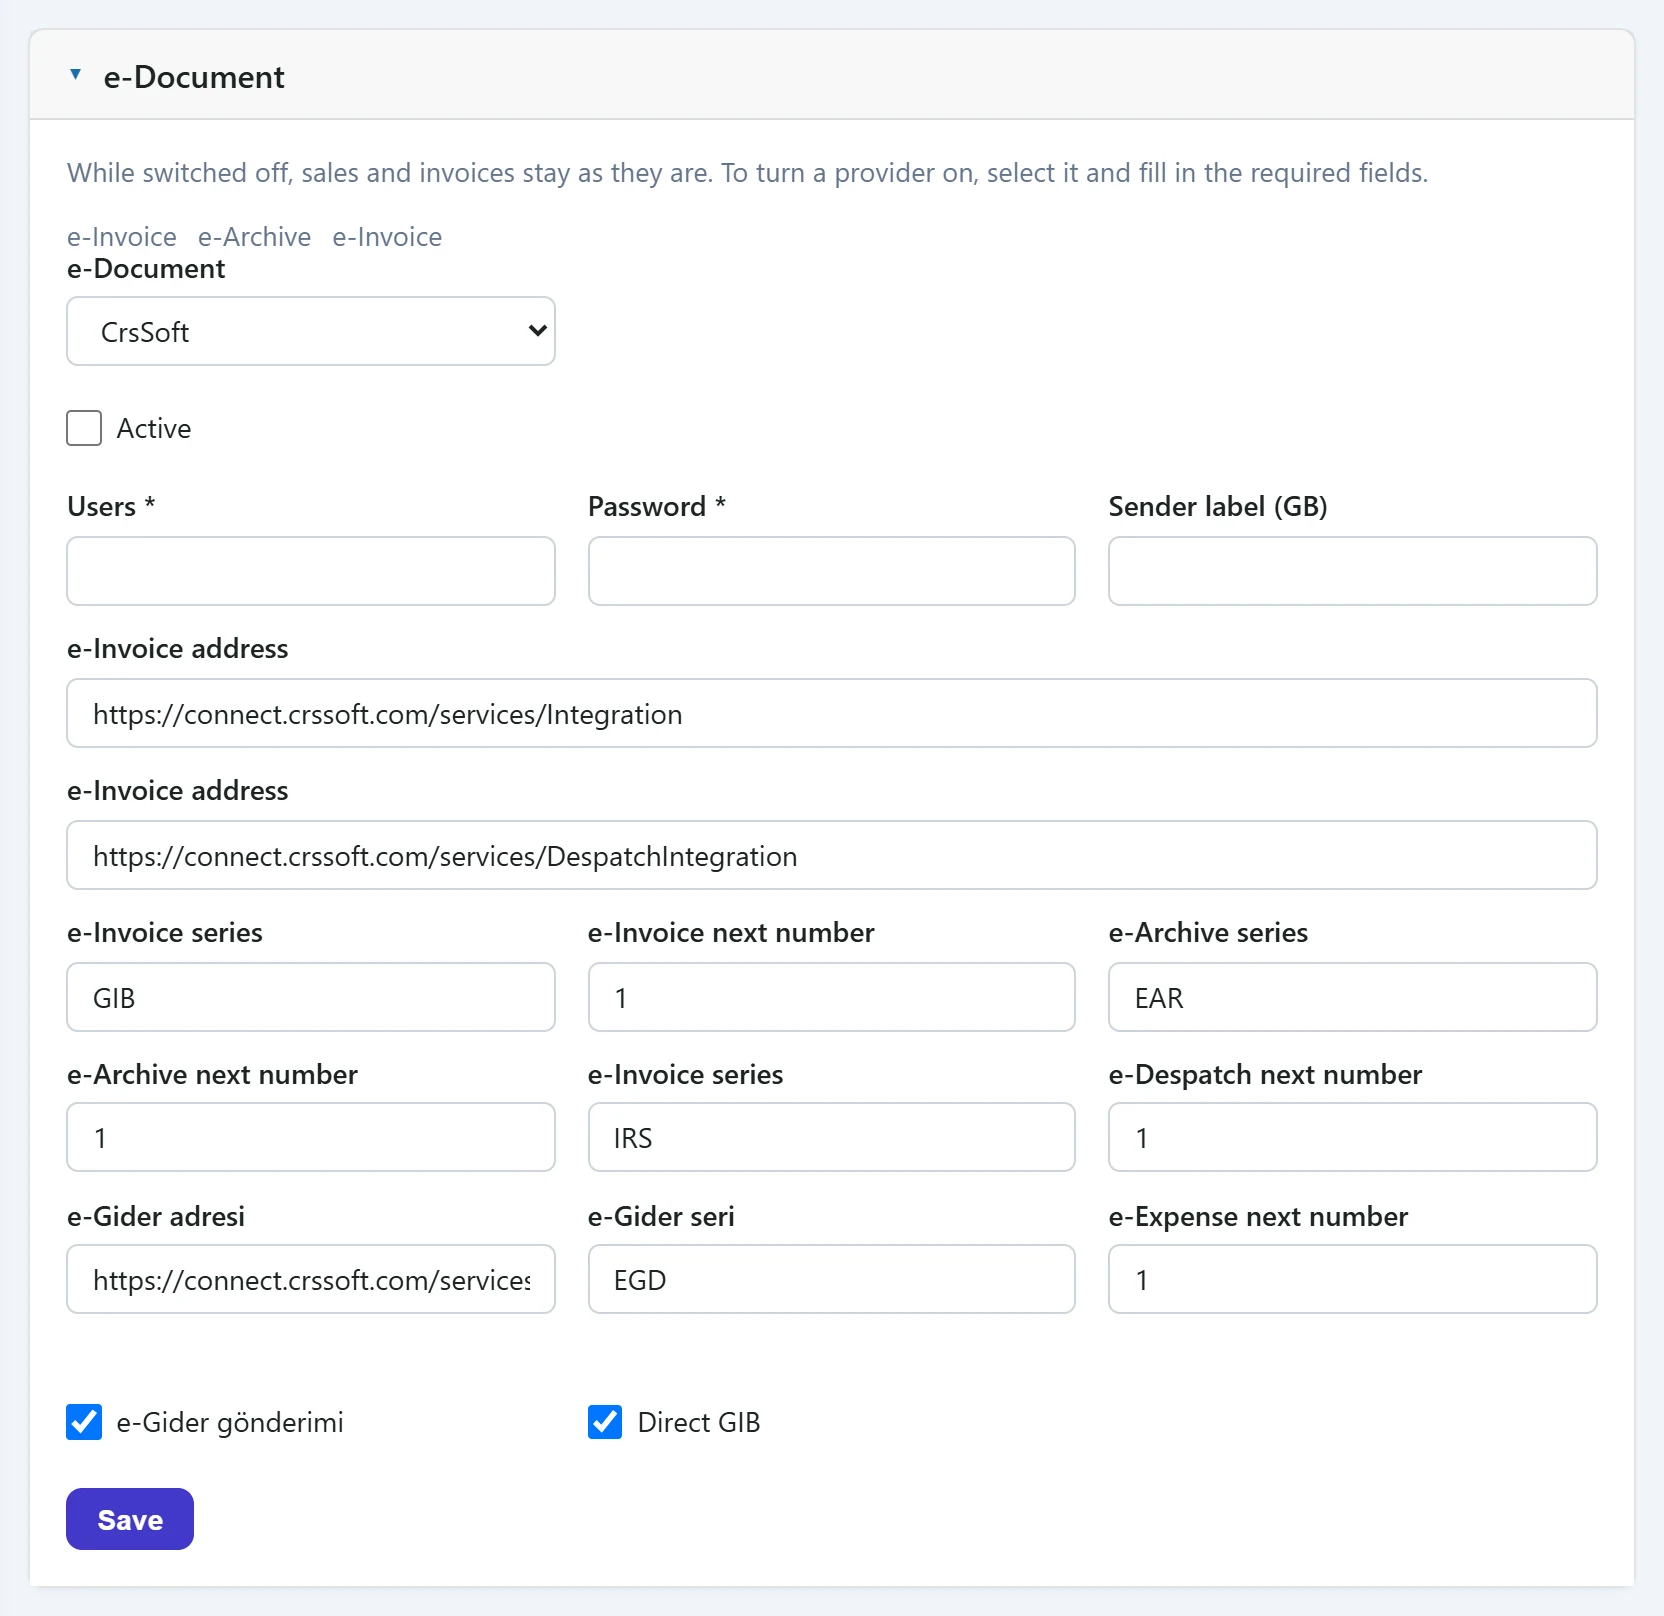
- 1Provider While «Not integrated» is selected, no e-documents are sent.
- 2Active If ticked and saved, sales documents are sent through this provider.
- 3Supported documents Document types the selected provider can send.
- 4Save Saves the connection details; «Test connection» then appears.
| Field | Sign in | Description |
|---|---|---|
| e-Document | Choice list | The integrator (special integrator) company. Only supported providers are listed. Options: No integration · CrsSoft · EDM · KolaySoft · Paraşüt · TURKKEP · Veriban · Izibiz |
| Users required | Text | Web service user name given by the integrator. Required. |
| Password required | Text | Web service password. Required; hidden after saving and unchanged if left empty. |
| Sender label (GB) | Text | Sender unit label at GİB (e.g. urn:mail:defaultgb@...). If empty, the integrator's default. |
| e-Invoice address | Text | Integrator's e-invoice service address; filled in when the provider is selected. |
| e-Invoice series | Text | 3-letter series prefix of the e-invoice number (e.g. GIB). |
| e-Invoice next number | Text | Next e-invoice number; used for the next submission. |
| e-Archive series | Text | Series prefix of the e-archive invoice. |
| e-Archive next number | Text | Next e-archive number. |
| e-Despatch next number | Text | Next e-waybill number. |
| e-Gider adresi | Text | e-Expense (expense voucher) service address. |
| e-Gider seri | Text | Series prefix of the e-expense document. |
| e-Expense next number | Text | Next e-expense number. |
- Open the e-Document panel and choose your integrator from the list. The documents the provider supports (e-invoice, e-archive, e-waybill) appear at the top of the panel.
- Enter the user and password given by the integrator. Service addresses are filled in when the provider is selected.
- Enter series and next numbers matching the last number in your integrator portal.
- Tick Active and press Save.
- After saving, use Test connection to check the details.
The other integration panels (fiscal cash register, listing site, ERP, cargo, TÜRMOB, online payments, agriculture reporting) work the same way: choose the provider, enter the requested keys, Save and Test connection. For the fiscal cash register you also choose the workplace the device belongs to and pair the device with Pair.
Saved passwords and keys are hidden on screen; if a box is left empty, the existing value does not change. Do not share keys with others.
Invoice designs (e-Document)
XSLT designs that define the look of e-invoices, e-archive invoices, e-waybills and similar documents. If you already have a design file, upload it with + Add template; otherwise choose the type and start from the Asya design with Create design. To make an uploaded design the default, use Edit → Save in the list.
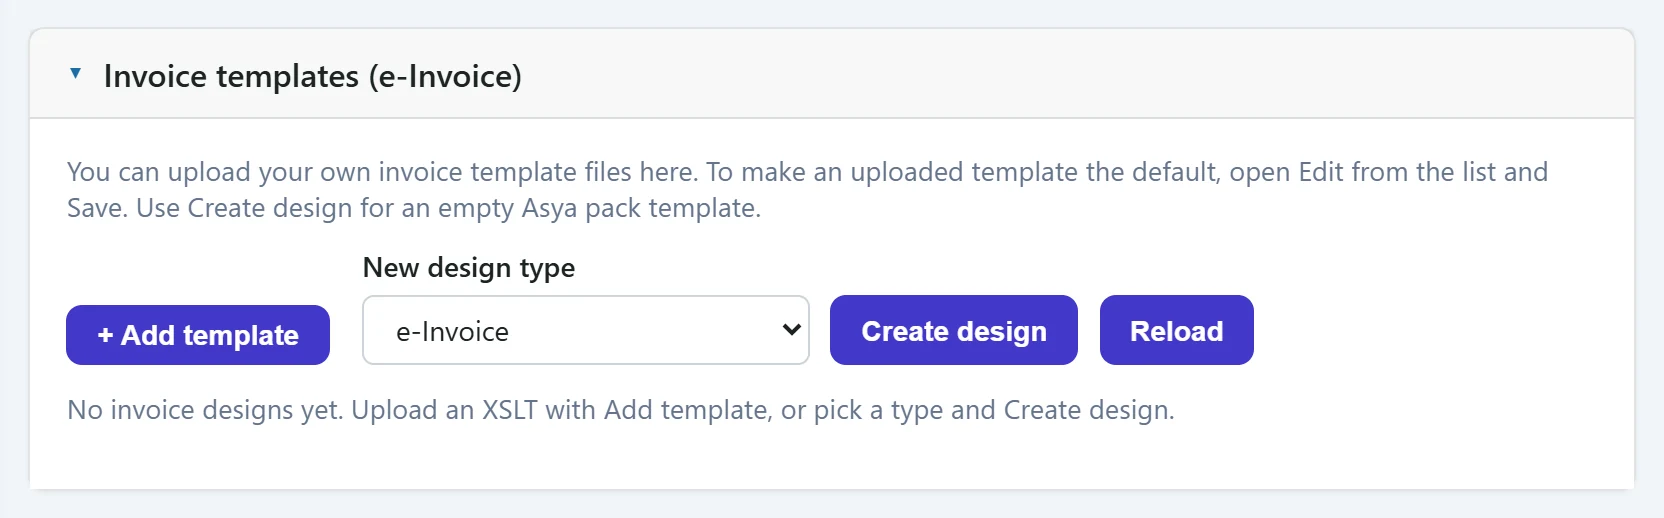
- 1+ Add template Uploads your .xslt / .xsl design file (max. 2 MB).
- 2New design type Which document the design is for: e-invoice, e-archive, e-waybill …
- 3Create design Opens an empty draft with the Asya design for the selected type.
- 4Reload Refreshes the design list.
Google Maps
Google keys for the map and road distance in address selection. If you do not enter your own key, the demo / test fallback key is used.
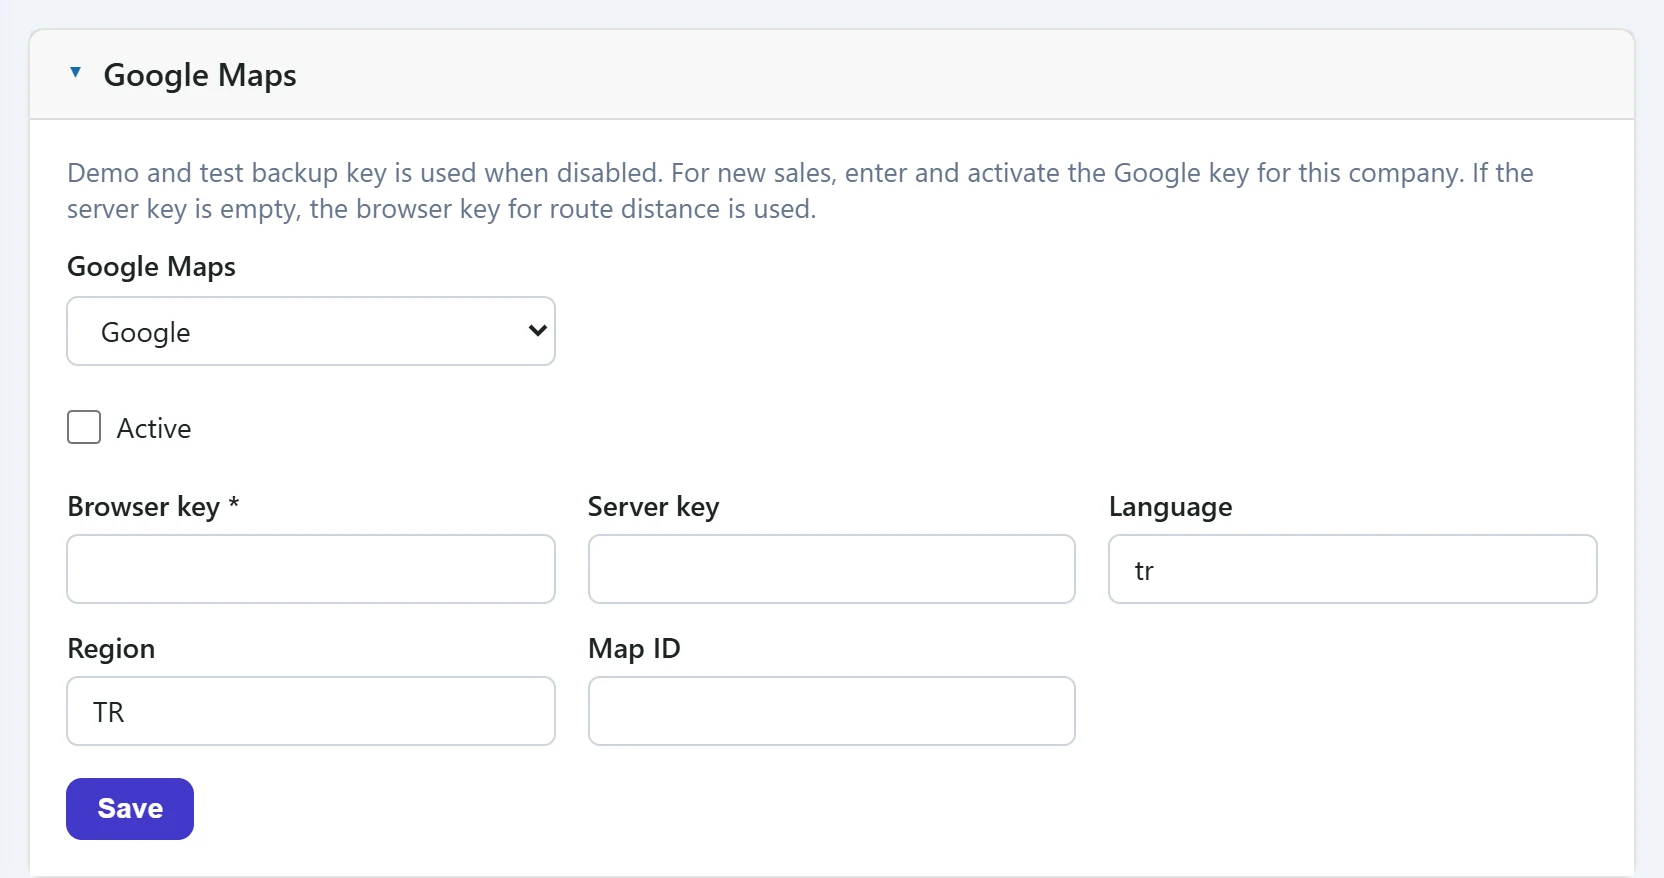
- 1Google Maps Provider selection.
- 2Save Saves the keys.
| Field | Sign in | Description |
|---|---|---|
| Google Maps | Choice list | Provider. With «Not integrated» the demo / test fallback key is used. Options: No integration · Google |
| Browser key required | Text | Google Maps JavaScript API key (to show the map on screen). Required. |
| Server key | Text | Server key for road distance calculation. If empty, the browser key is used. |
| Language | Text | Language of map labels (e.g. tr). |
| Region | Text | Preferred country code in address search (e.g. TR). |
| Map ID | Text | Map style ID defined in Google Cloud (optional). |
Code template types
The types used in the code templates of account, material and service cards. Next to the three built-in top types you can add new top types (e.g. «Staff», behaviour base Account) and sub-types beneath them (e.g. «Wholesaler» under Account).
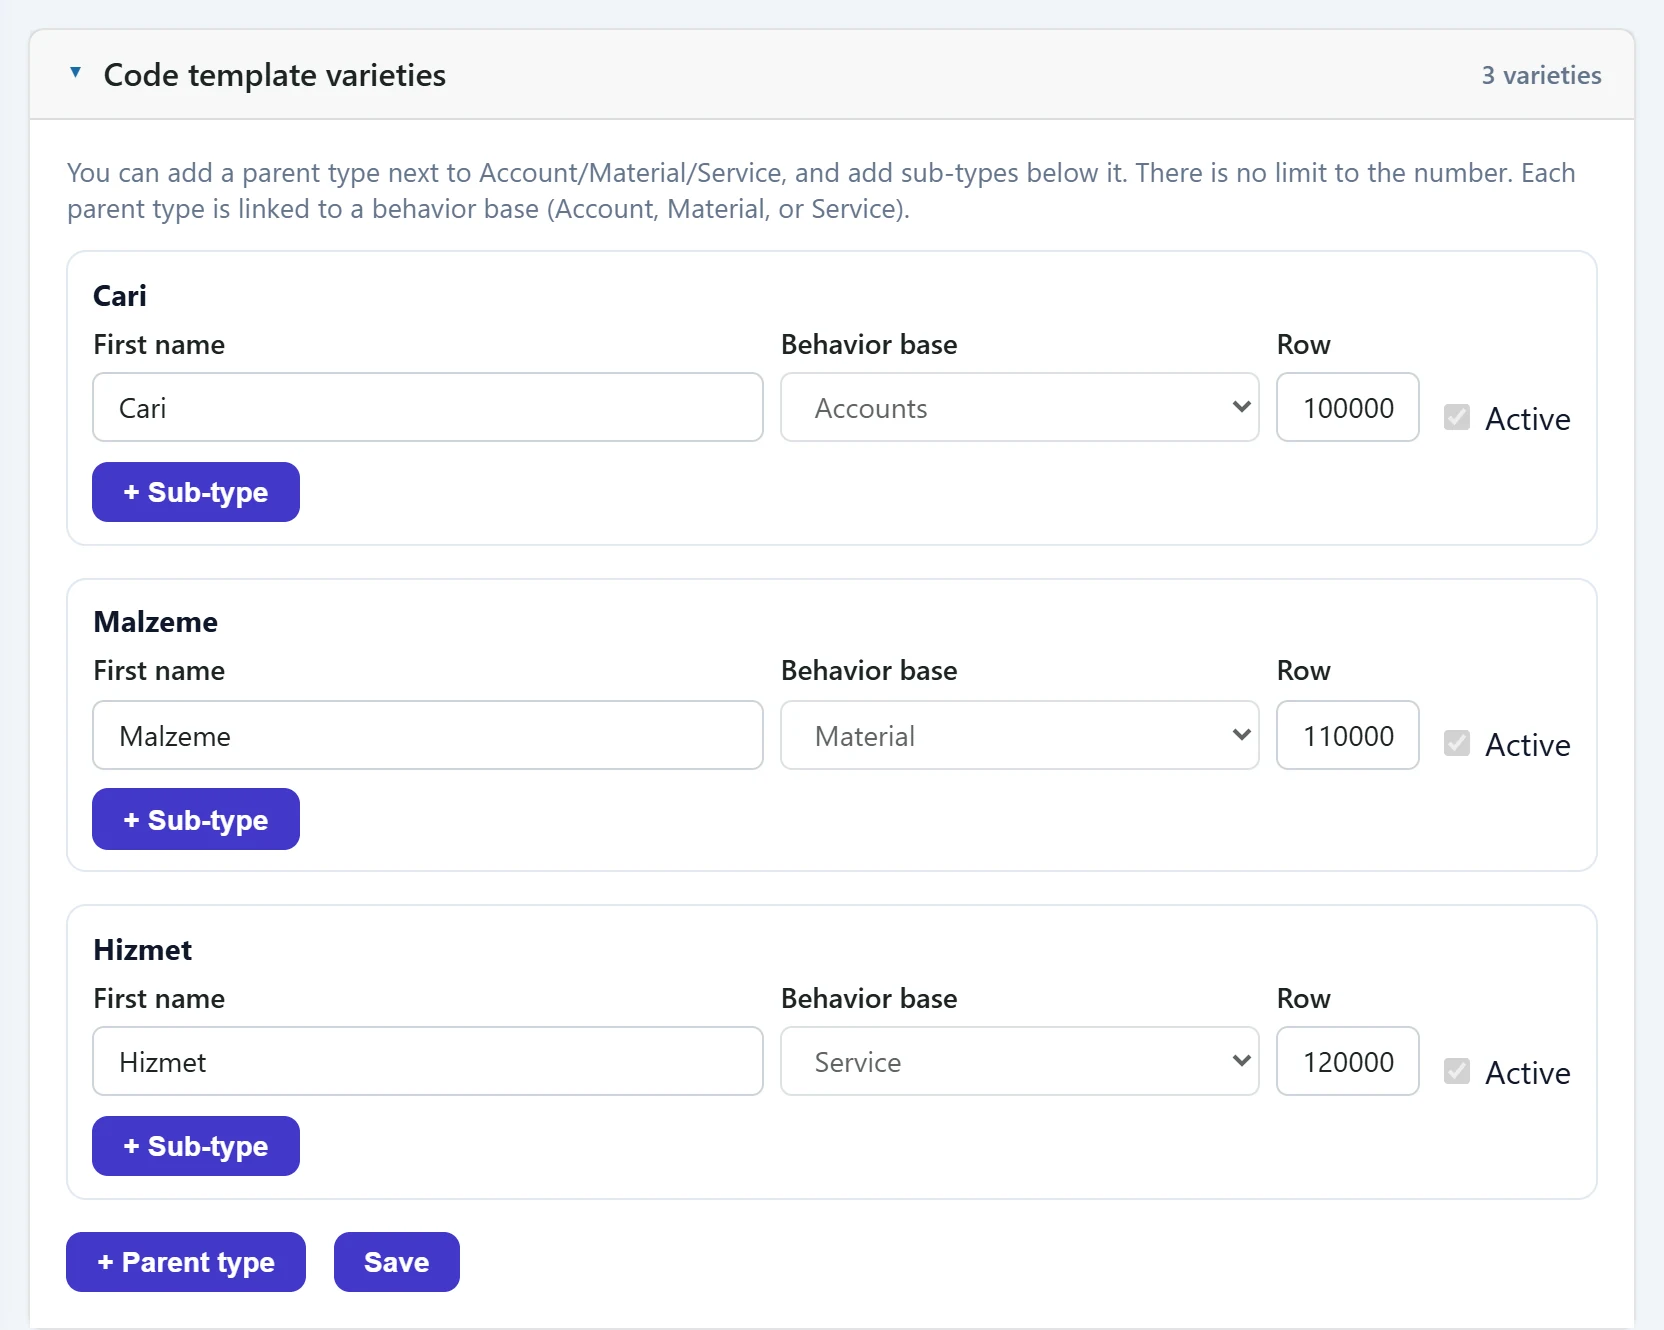
- 1Top type card Built-in types: Account, Material, Service.
- 2+ Sub-type Adds a sub-type under this type.
- 3+ Parent type Adds a new top type.
- 4Save Saves all types.
| Field | Sign in | Description |
|---|---|---|
| First name | Text | Name of the type (e.g. «Wholesaler»). The names of the three built-in types (Account, Material, Service) cannot be changed. |
| Behavior base | Choice list | Which card the new top type behaves like: Account, Material or Service. Options: Accounts · Material · Service |
| Row | Text | Display order in lists; smaller numbers come first. |
| Active | Checkbox | An unticked type cannot be selected in new records. |
- Press + Top type for a new top type, or the card's + Sub-type button for a type under an existing one.
- Enter the Name; for a new top type choose the behaviour base.
- Press Save. A confirmation message appears.
Commerce preferences
Company-wide preferences such as unit entry on document lines, Today screen cards, numbering and material card sections.
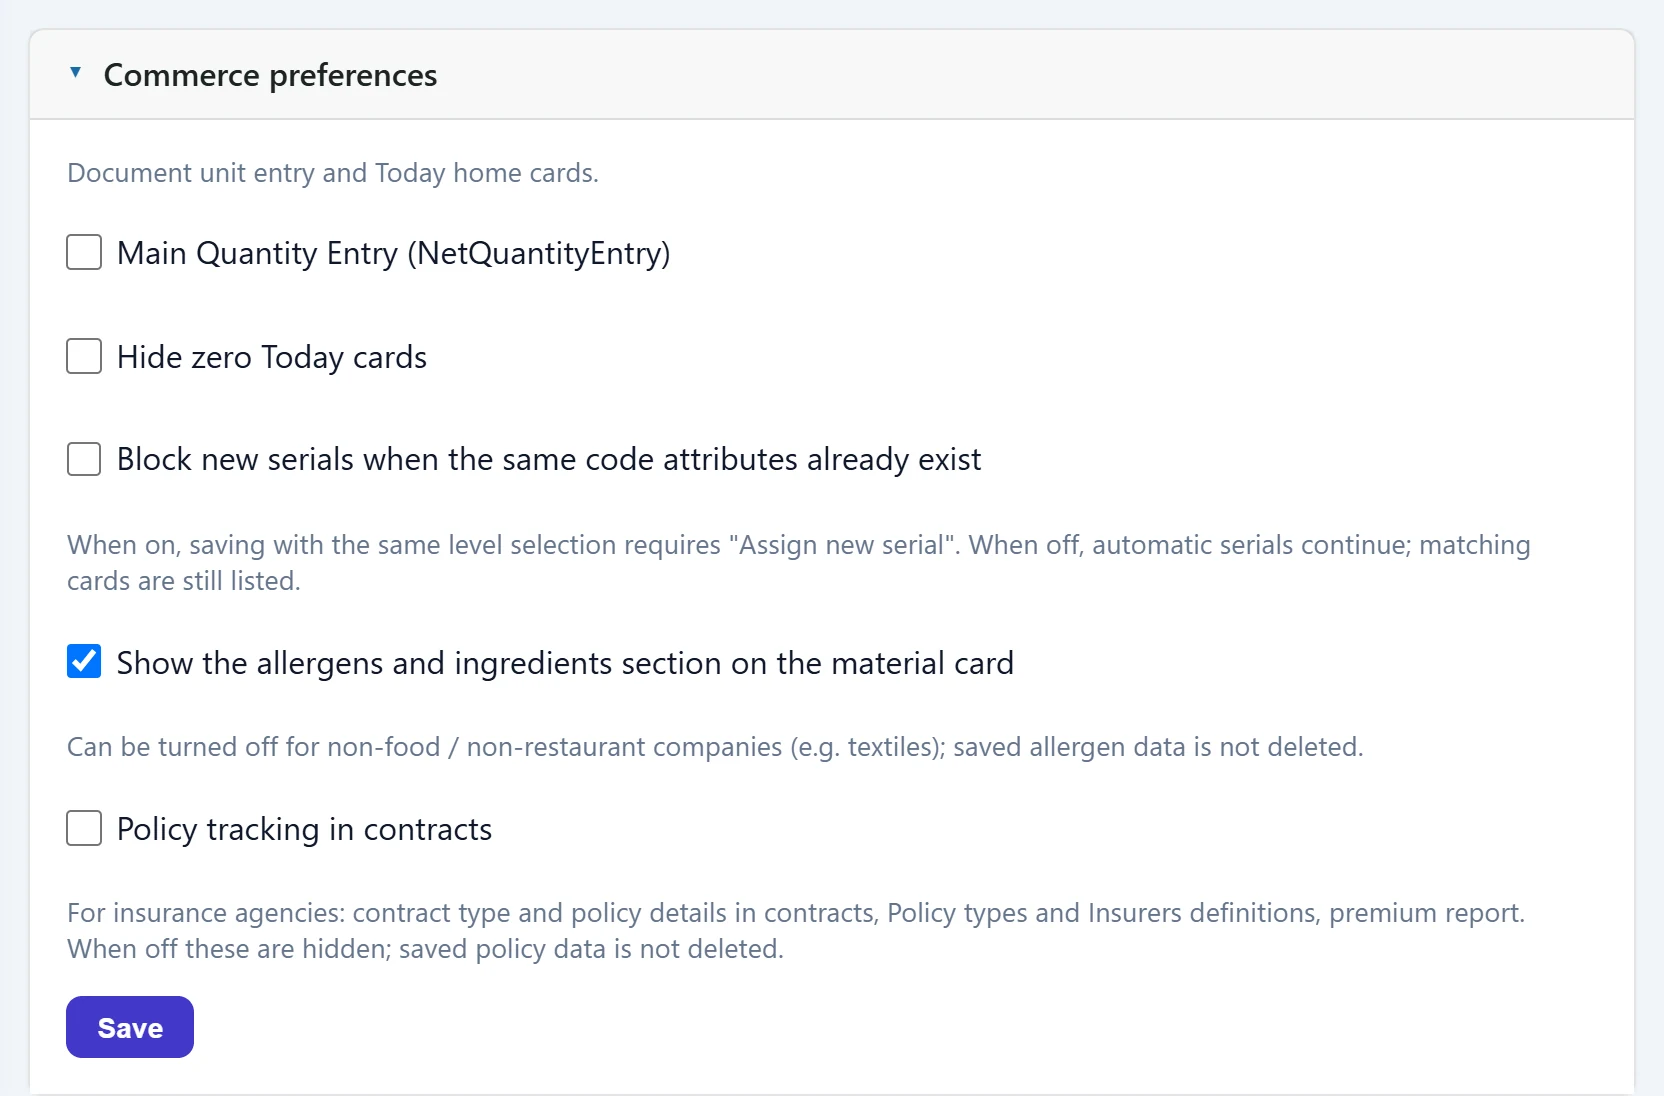
- 1Save Saves the preferences.
| Field | Sign in | Description |
|---|---|---|
| Main Quantity Entry (NetQuantityEntry) | Checkbox | If ticked, the quantity on document lines is entered in the base unit of the unit set. |
| Hide zero Today cards | Checkbox | Cards with a value of zero are not shown on the Today screen. |
| Policy tracking in contracts | Checkbox | For insurance agencies: turns on policy details, Policy types and Insurance companies definitions and the premium report. |
Receipt printing
Header, logo and footer note of sales and order receipts. The same receipt prints from the browser (58 / 80 mm) and from the mobile app to a Bluetooth thermal printer. The printer and paper width are not company settings; they are chosen on each phone under Receipt printer.
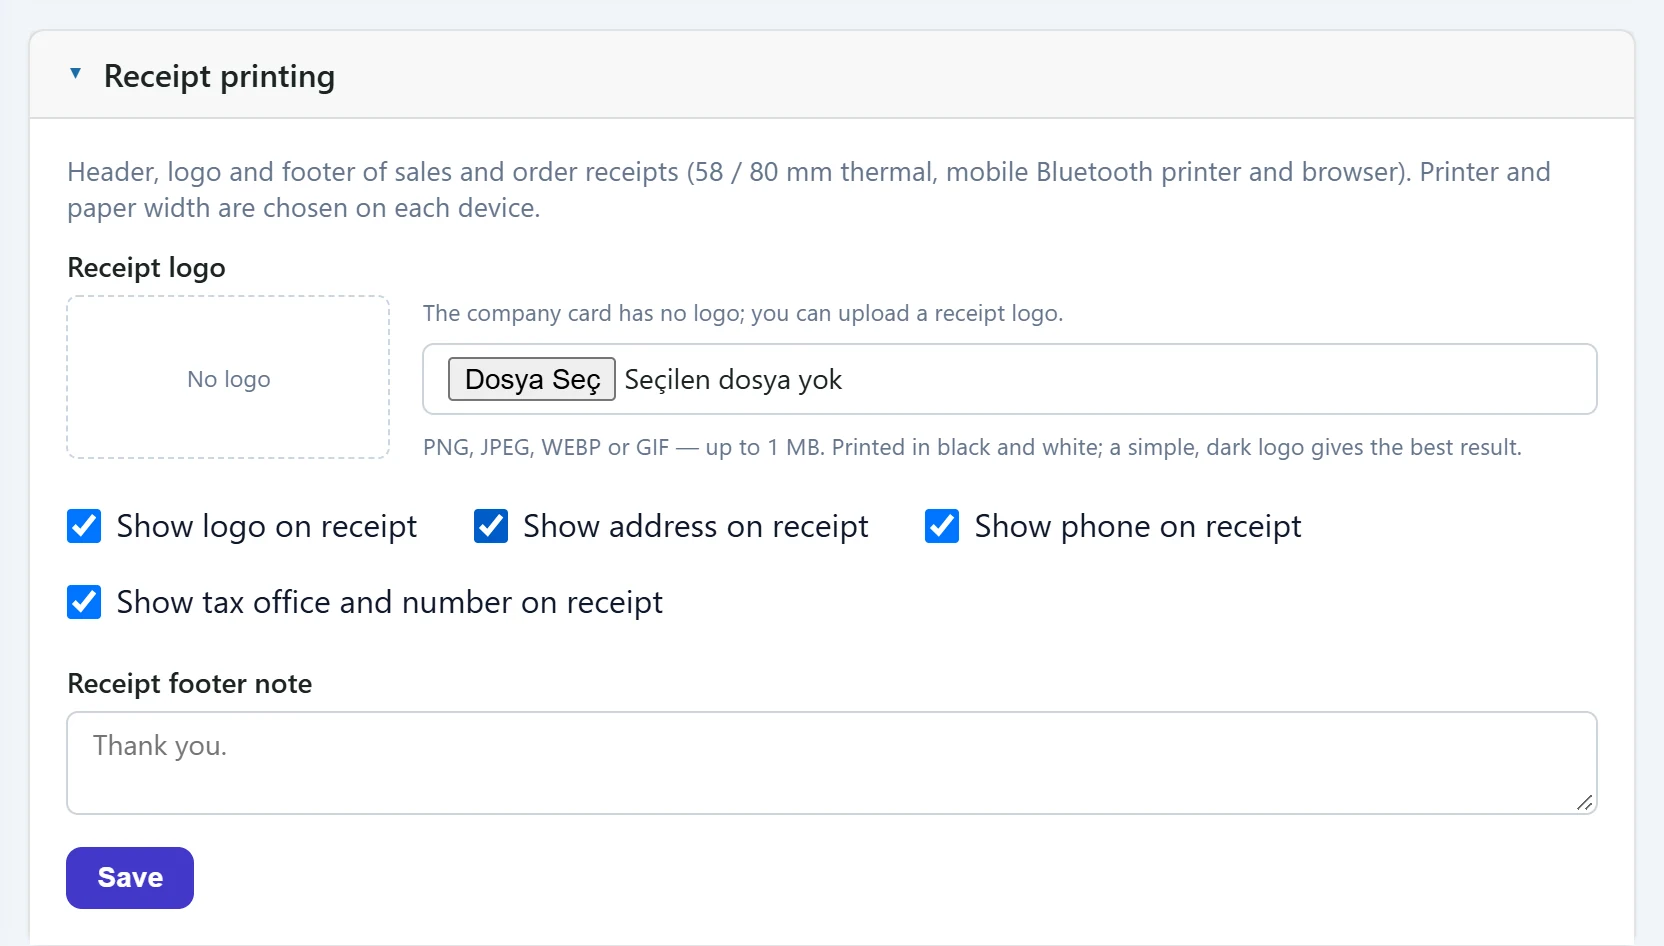
- 1Receipt logo The chosen image is uploaded at once; “Use company logo” removes the receipt logo.
- 2Save Saves the header options and the footer note.
| Field | Sign in | Description |
|---|---|---|
| Show logo on receipt | Checkbox | When off, no logo is printed on the receipt. |
| Show address on receipt | Checkbox | Writes the company address in the receipt header. |
| Show phone on receipt | Checkbox | Writes the company phone in the receipt header. |
| Show tax office and number on receipt | Checkbox | Writes the tax office / tax number line in the receipt header. |
| Receipt footer note | Long text | Free note at the bottom of the receipt; if empty, “Thank you.” is printed. Placeholder: «Thank you.» |
Thermal printers print black only. A simple, dark logo on a white background gives the sharpest result; a coloured logo prints as grey dots.
Company features
Switches that turn sector-specific screens and fields on or off. While a feature is off, the related menus and fields are hidden.
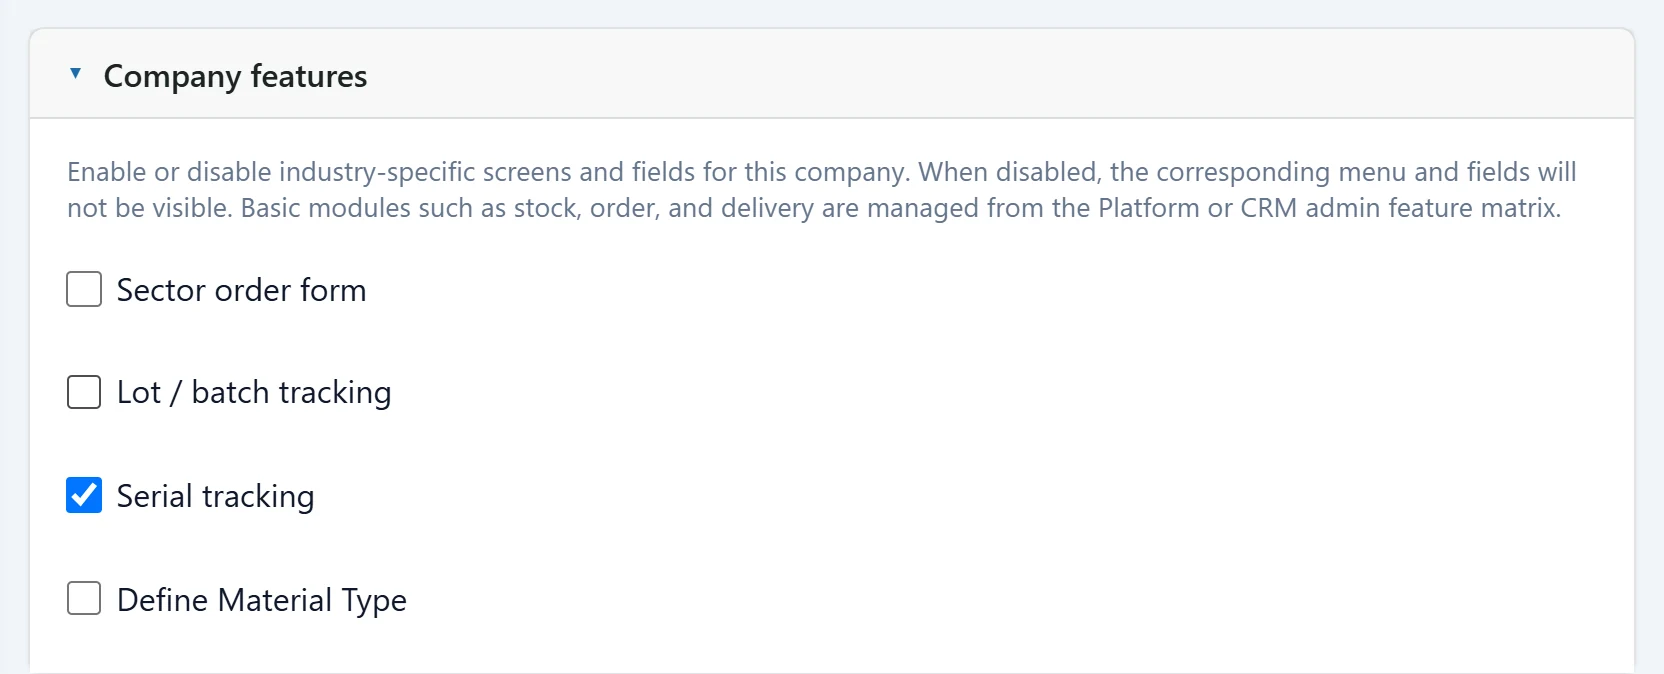
- 1Feature switch Saved immediately when ticked / unticked; there is no Save button.
- 2Serial tracking When on, the Serials screen appears in the Stock menu.
| Field | Sign in | Description |
|---|---|---|
| Sector order form | Checkbox | Turns on sector-specific extra fields (size, model, etc.) on orders. |
| Lot / batch tracking | Checkbox | Tracking stock by roll, batch or lot number (e.g. fabric, food). |
| Serial tracking | Checkbox | Tracks products by serial number; the Serials screen appears in the Stock menu. |
| Define Material Type | Checkbox | Choosing a type (trade goods, raw material, finished product …) becomes mandatory on the material card. |
The boxes in this panel are saved the moment you tick them; there is no separate Save button. Core modules such as stock, orders and waybills are managed in the Platform Admin feature matrix, not here.
Common messages
| Message | Cause | Solution |
|---|---|---|
| Company name is required. | Name is empty in company information. | Enter the company name and save again. |
| Tax number is invalid. | The number does not match the 10-digit tax number or 11-digit ID number rule. | Check the number on your tax certificate and enter it again. |
| Changing requires a company administrator or settings permission. | The user has no settings permission. | Ask the company administrator for the settings permission on the Permissions screen. |
| Account code digits must start with 3 and consist of dash-separated numbers 1–9 (e.g. 3-2-3-4). | The digit format is invalid. | Enter dash-separated numbers starting with 3. |
| The separator cannot be changed in a company with sub-accounts. | The chart of accounts has sub-accounts. | Leave the separator as it is. |
| Name required. | A code template type row has no name. | Enter the name or delete the row. |
| No types to save. | No change was made to the code template types. | — |
| You do not have permission to change this setting. | No permission to change company features. | Contact the company administrator. |