
 AsyaTicari
 AsyaRestoran
 AsyaOtel
 AsyaCrm
 AsyaKlinik
 AsyaSpor
 AsyaSSH
 AsyaEmlak
 AsyaFilo
 AsyaPuantaj
 AsyaİSG
 AsyaİHD
 Kolay Öğren
Shared modules · General
Quick sale
Counter sales by scanning a barcode or tapping a product button; keypad for quantity, price and discount; cash, POS, mixed and credit payment.
Quick sale is the sales screen used at the counter. Scan the product's barcode or tap its picture button; the cart fills on the right and pressing a payment method completes the sale. Every sale is saved as a Retail sale document; it is deducted from stock and the payment is posted to the cash register or POS account.
Parts of the screen
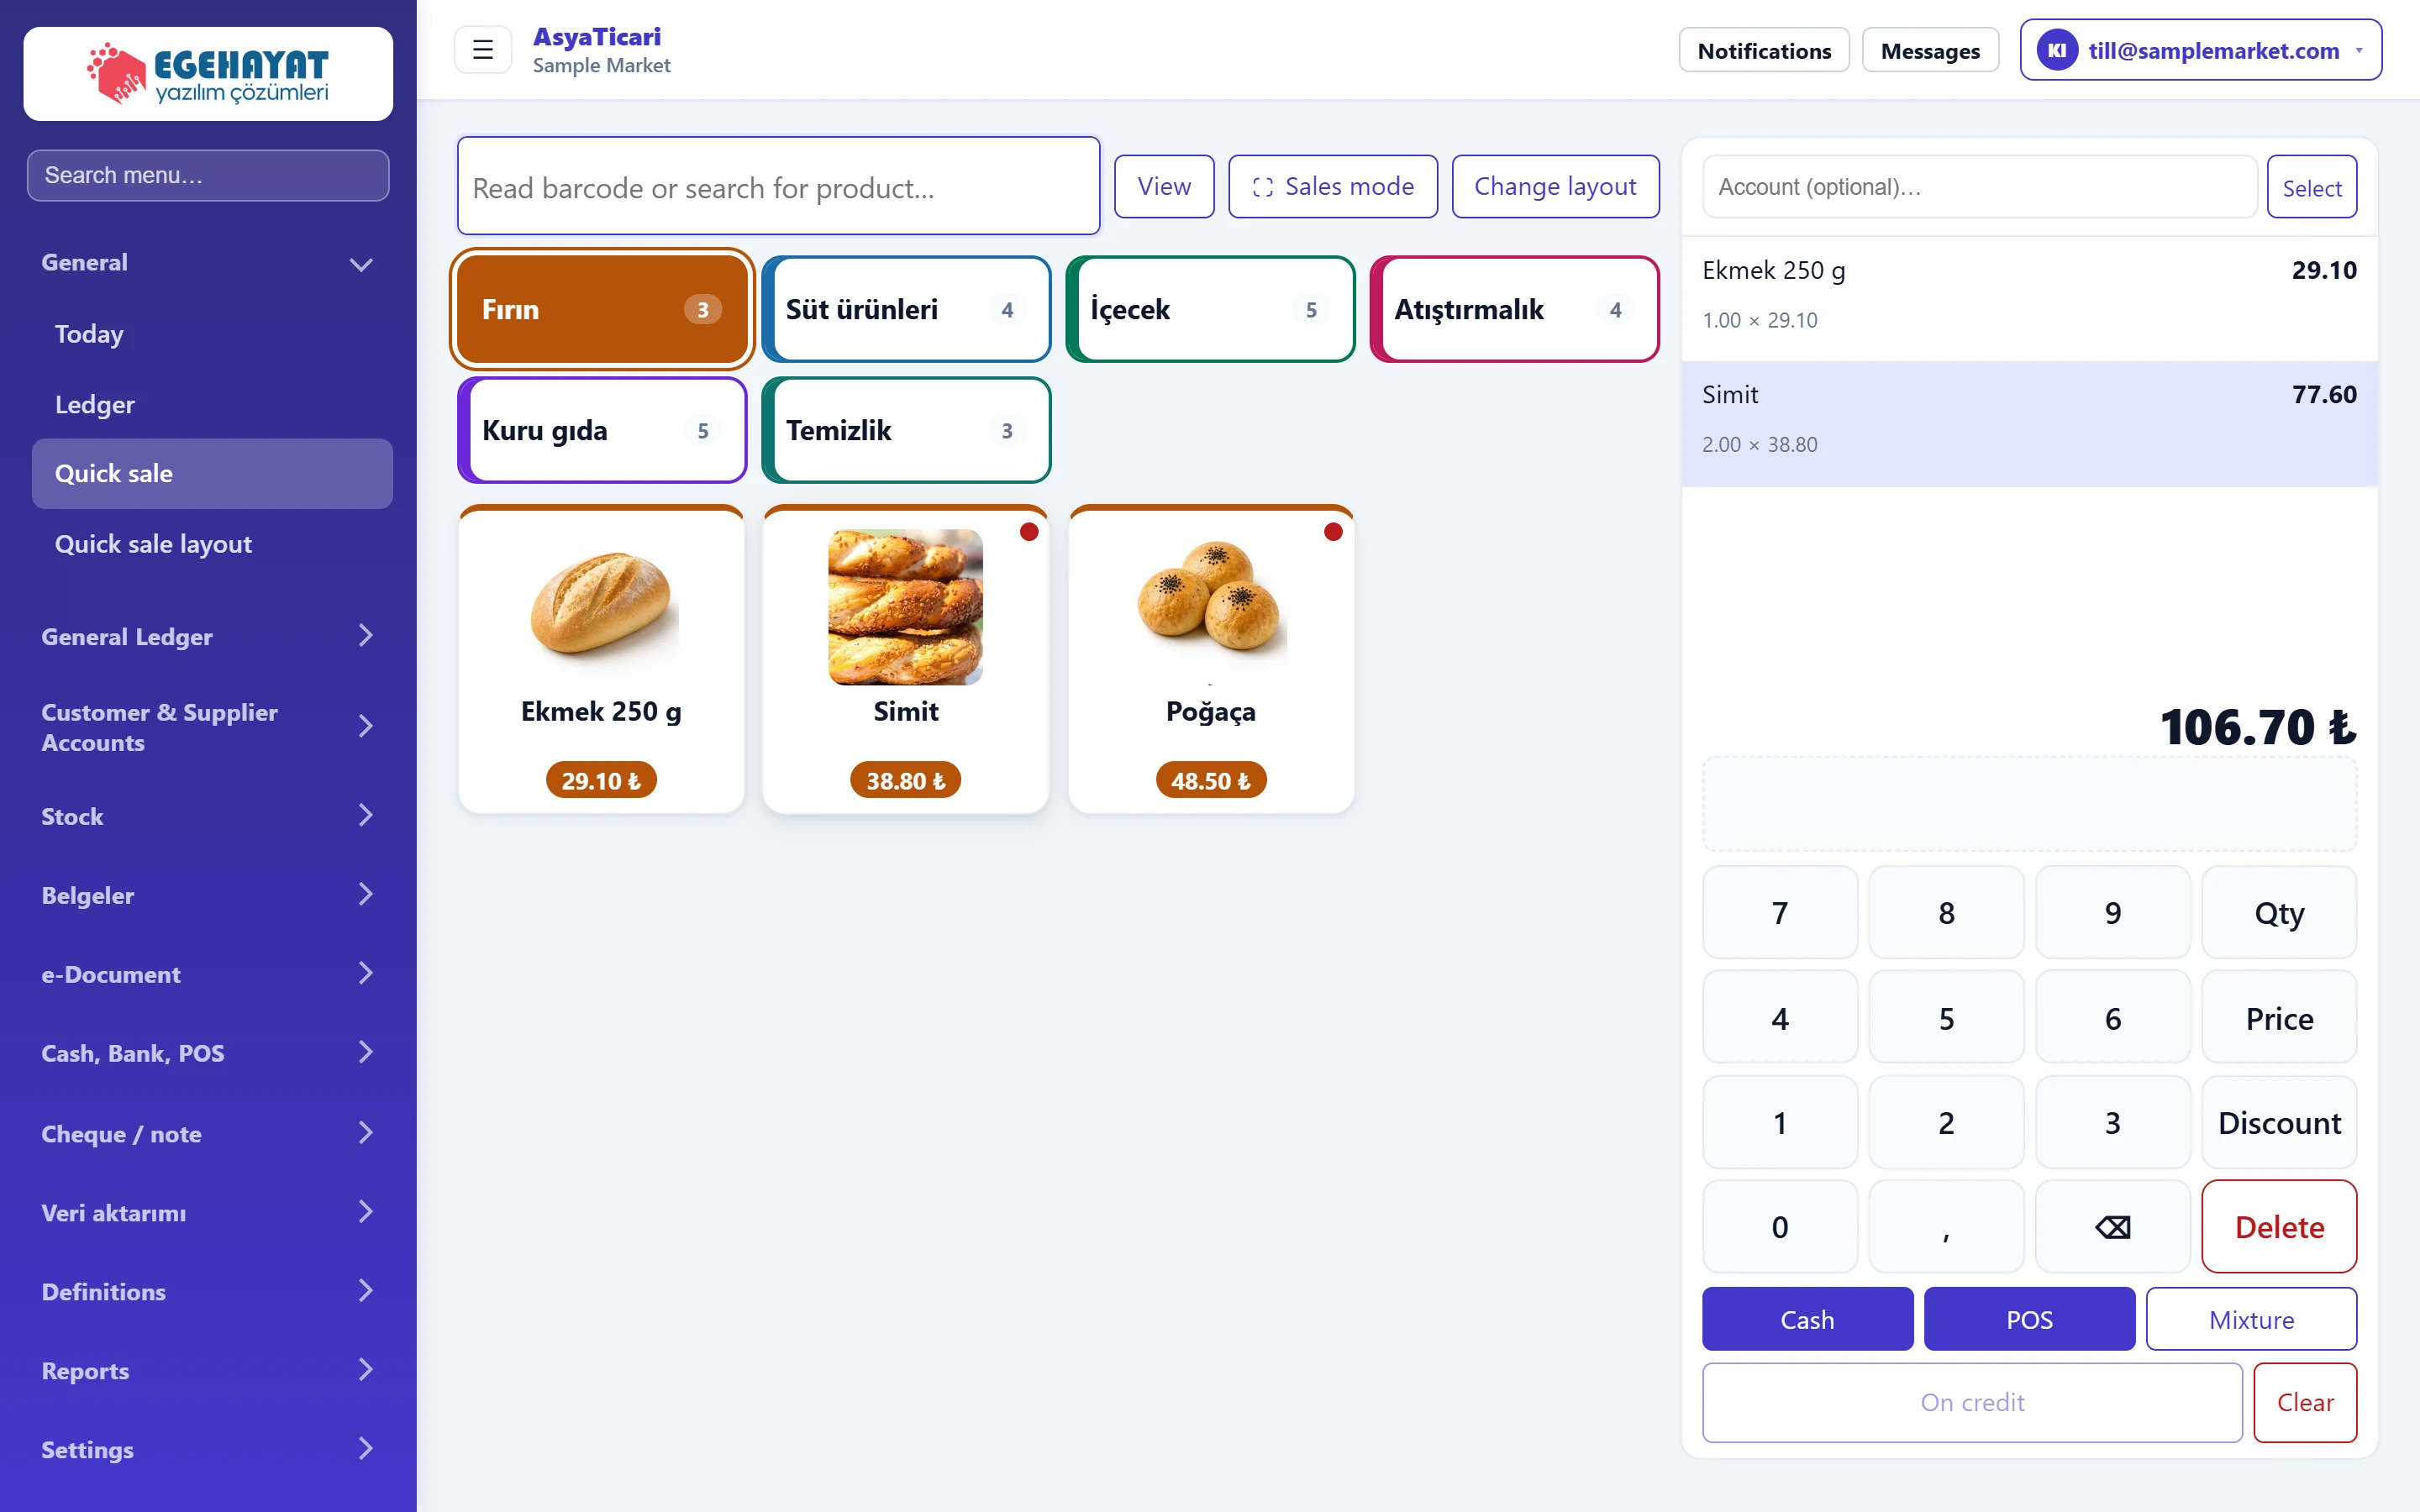
- 1Barcode / search Scan the barcode or type the product name / code; Enter adds it to the cart.
- 2Tabs Product tabs (categories); the number is the button count of the tab.
- 3Product button Product button: click to add 1 unit to the cart.
- 4Cart Products in the cart; click a line to select it.
- 5Keypad Number keypad for quantity, price and discount.
- 6Payment Payment method: cash, POS or mixed.
On the left are the search box, product tabs and product buttons; on the right the cart, keypad and payment buttons. The small mark in the top right corner of a button means «Low stock».
Search and view

- 1Barcode / search The barcode scanner types into this box; typing a name lists matching products below.
- 2View Button size, long name and column settings (personal).
- 3Sales mode Hides the menus and dedicates the screen to selling (full screen).
- 4Change layout Opens the quick sale layout screen (authorised users).
- Barcode / search box: the barcode scanner types into this box and sends Enter; the product is added to the cart. Typing a product name or code lists matching products below the box; click one to add it.
- View: sets the button size and number of columns for you.
- Sales mode: hides the menus and dedicates the screen to selling.
- Change layout: only shown to users with layout permission; opens Quick sale layout.
View settings
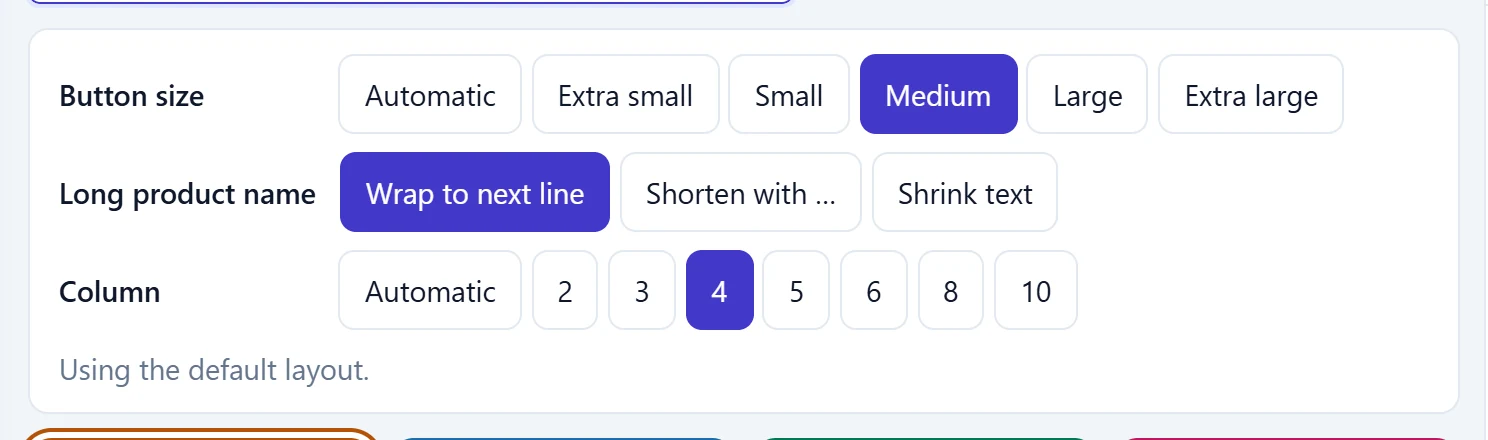
- 1Button size Very small … very large buttons.
- 2Long product name Long names wrap to a new line, are shortened or shrunk.
- 3Column Buttons per row; Automatic follows the screen width.
Your choice applies immediately and is saved for you (it can be kept per workplace). The note below says where the setting comes from; Revert to default returns to the layout default. At the very small size no product pictures are shown.
Cart and payment
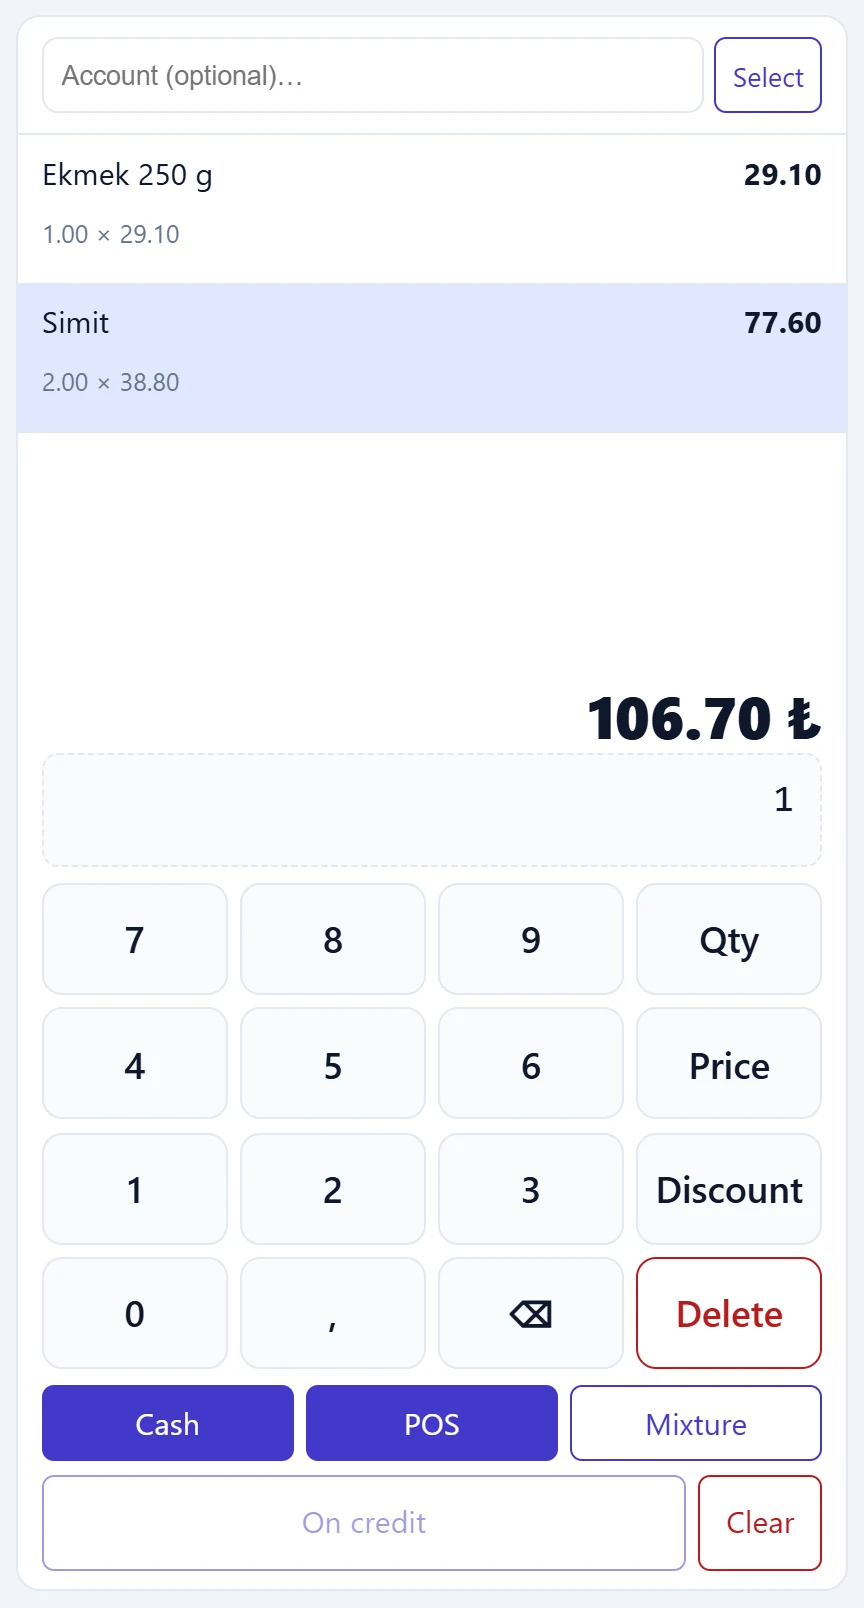
- 1Account Links the sale to an account (required for credit).
- 2Selected line Selected line; Qty / Price / Delete on the keypad apply to it.
- 3106.70 ₺ Total to pay (after discount).
- 4Entered number The number you typed on the keypad.
- 5Qty Makes the typed number the quantity of the selected line.
- 6Price Makes the typed number the unit price of the selected line.
- 7Discount Applies the typed amount as a discount to the cart.
- 8Cash Cash sale; type the amount handed over first and the change is calculated.
- 9POS Card sale (to the defined POS account).
- 10Mixture Split between cash and POS; the remainder can go on credit.
- 11On credit Charges the whole amount to the account (enabled when an account is selected).
The keypad works like this: type the number first, then press the action button.
| You want to | How |
|---|---|
| Add several of a product | Type the number (e.g. 3), then tap the product button. |
| Change the quantity in the cart | Select the line, type the number, press Qty. Typing 0 removes the line. |
| Change the price | Select the line, type the new unit price, press Price. The old price appears on the line as «List …». |
| Give a discount on the cart | Type the discount amount, press Discount. Subtotal and discount appear above the total. |
| Remove a line | Select the line, press Delete. |
| Empty the cart | Clear. |
Payment buttons:
- Cash: posted to the cash register. If you first type the amount the customer handed over and then press Cash, the change is calculated and shown on the result screen.
- POS: the whole amount is posted to the defined POS account.
- Mixed (shown as «Mixture»): lets you split the payment into cash and POS (see below).
- On credit: charges the whole amount to the selected account; only enabled when an account is selected above the cart.
Mixed payment
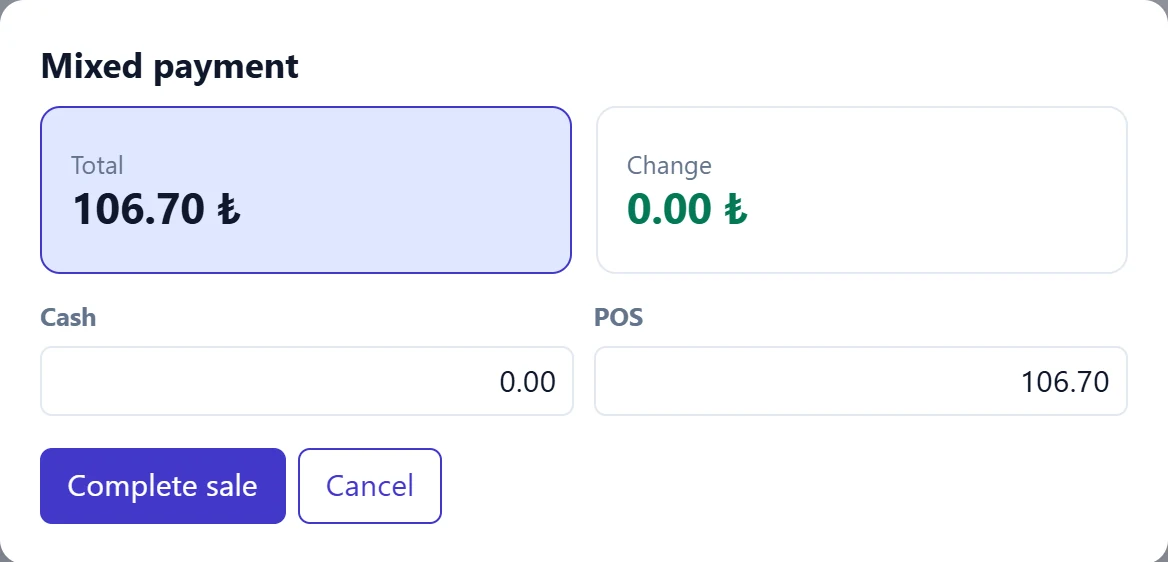
- 1Total / remainder Total and remainder (or change).
- 2Complete sale Saves the sale; any remainder goes on credit if an account is selected.
| Field | Sign in | Description |
|---|---|---|
| Cash | Text | Part paid in cash. |
| POS | Text | Part paid by card; defaults to the whole total. |
If cash plus POS is less than the sale total, «Remaining» shows in red. If an account is selected, the remainder is charged to it on credit; otherwise Complete sale stays disabled. Extra cash is shown as change.
Making a sale: step by step
- Scan the barcode or tap the product button in a tab.
- If needed, select a line and change the quantity or price with the keypad.
- For a credit or invoiced customer, choose the customer in the Account box above the cart.
- Take the payment: Cash, POS, mixed or On credit.
- The «Sale completed» screen shows the document number, total and any change. Print receipt opens the receipt in a new tab (choose 80 mm or 58 mm paper in the box at the top); New sale returns to an empty cart. The receipt logo, header and footer note are set under Settings → Control panel → Receipt printing.
If PayTR is set up for the company, a PayTR button appears next to the payment buttons; enter the customer's e-mail and open the payment page to take a card payment remotely.
Once saved, the sale is deducted from stock and posted to the cash register. To undo a wrong sale, open the document from Documents → Retail sale and cancel it.
Common messages
| Message | Cause | Solution |
|---|---|---|
| Define a cash register or POS account before making a sale. | The company has neither a cash register nor a POS. | Open an account under Cash, Bank, POS. |
| Product not found: … | No card has the scanned barcode or code. | Add the barcode to the stock card or search by name. |
| Cash register not defined. / POS account not defined. | No account for the chosen method (the button stays disabled). | Open the account or select the cash register / POS in Quick sale layout. |
| Payment amount is insufficient. Select an account for credit sales. | The mixed payment is short and no account is selected. | Complete the amount or select an account. |
| Cart is empty. | Payment attempted without products. | Add products first. |
| Quick sale button not found. Add a stock card or change the layout. | The layout has no buttons. | Create stock cards or add buttons in Quick sale layout. |
| You do not have quick sale permission. | The user's quick sale permission is off. | The company administrator enables it under Settings → Permissions. |
| Using the quick sale feature with PayTR is not available when the cash register is open. | Fiscal cash register integration is active. | Sell with cash / POS. |