
 AsyaTicari
 AsyaRestoran
 AsyaOtel
 AsyaCrm
 AsyaKlinik
 AsyaSpor
 AsyaSSH
 AsyaEmlak
 AsyaFilo
 AsyaPuantaj
 AsyaİSG
 AsyaİHD
 Kolay Öğren
AsyaKlinik · Patients
Patient card
A patient's whole record on one page: details, appointments, examinations, prescriptions, account, documents, tests and quick action buttons.
The patient card brings together all of a patient's records at the clinic on a single page. Open it with the Open button on a row of the Patients list, or from the Search patient… box in the left menu. From top to bottom the page shows the header and action buttons, patient and address information, and then the notes, appointment, examination, prescription, account, document, report and test lists.
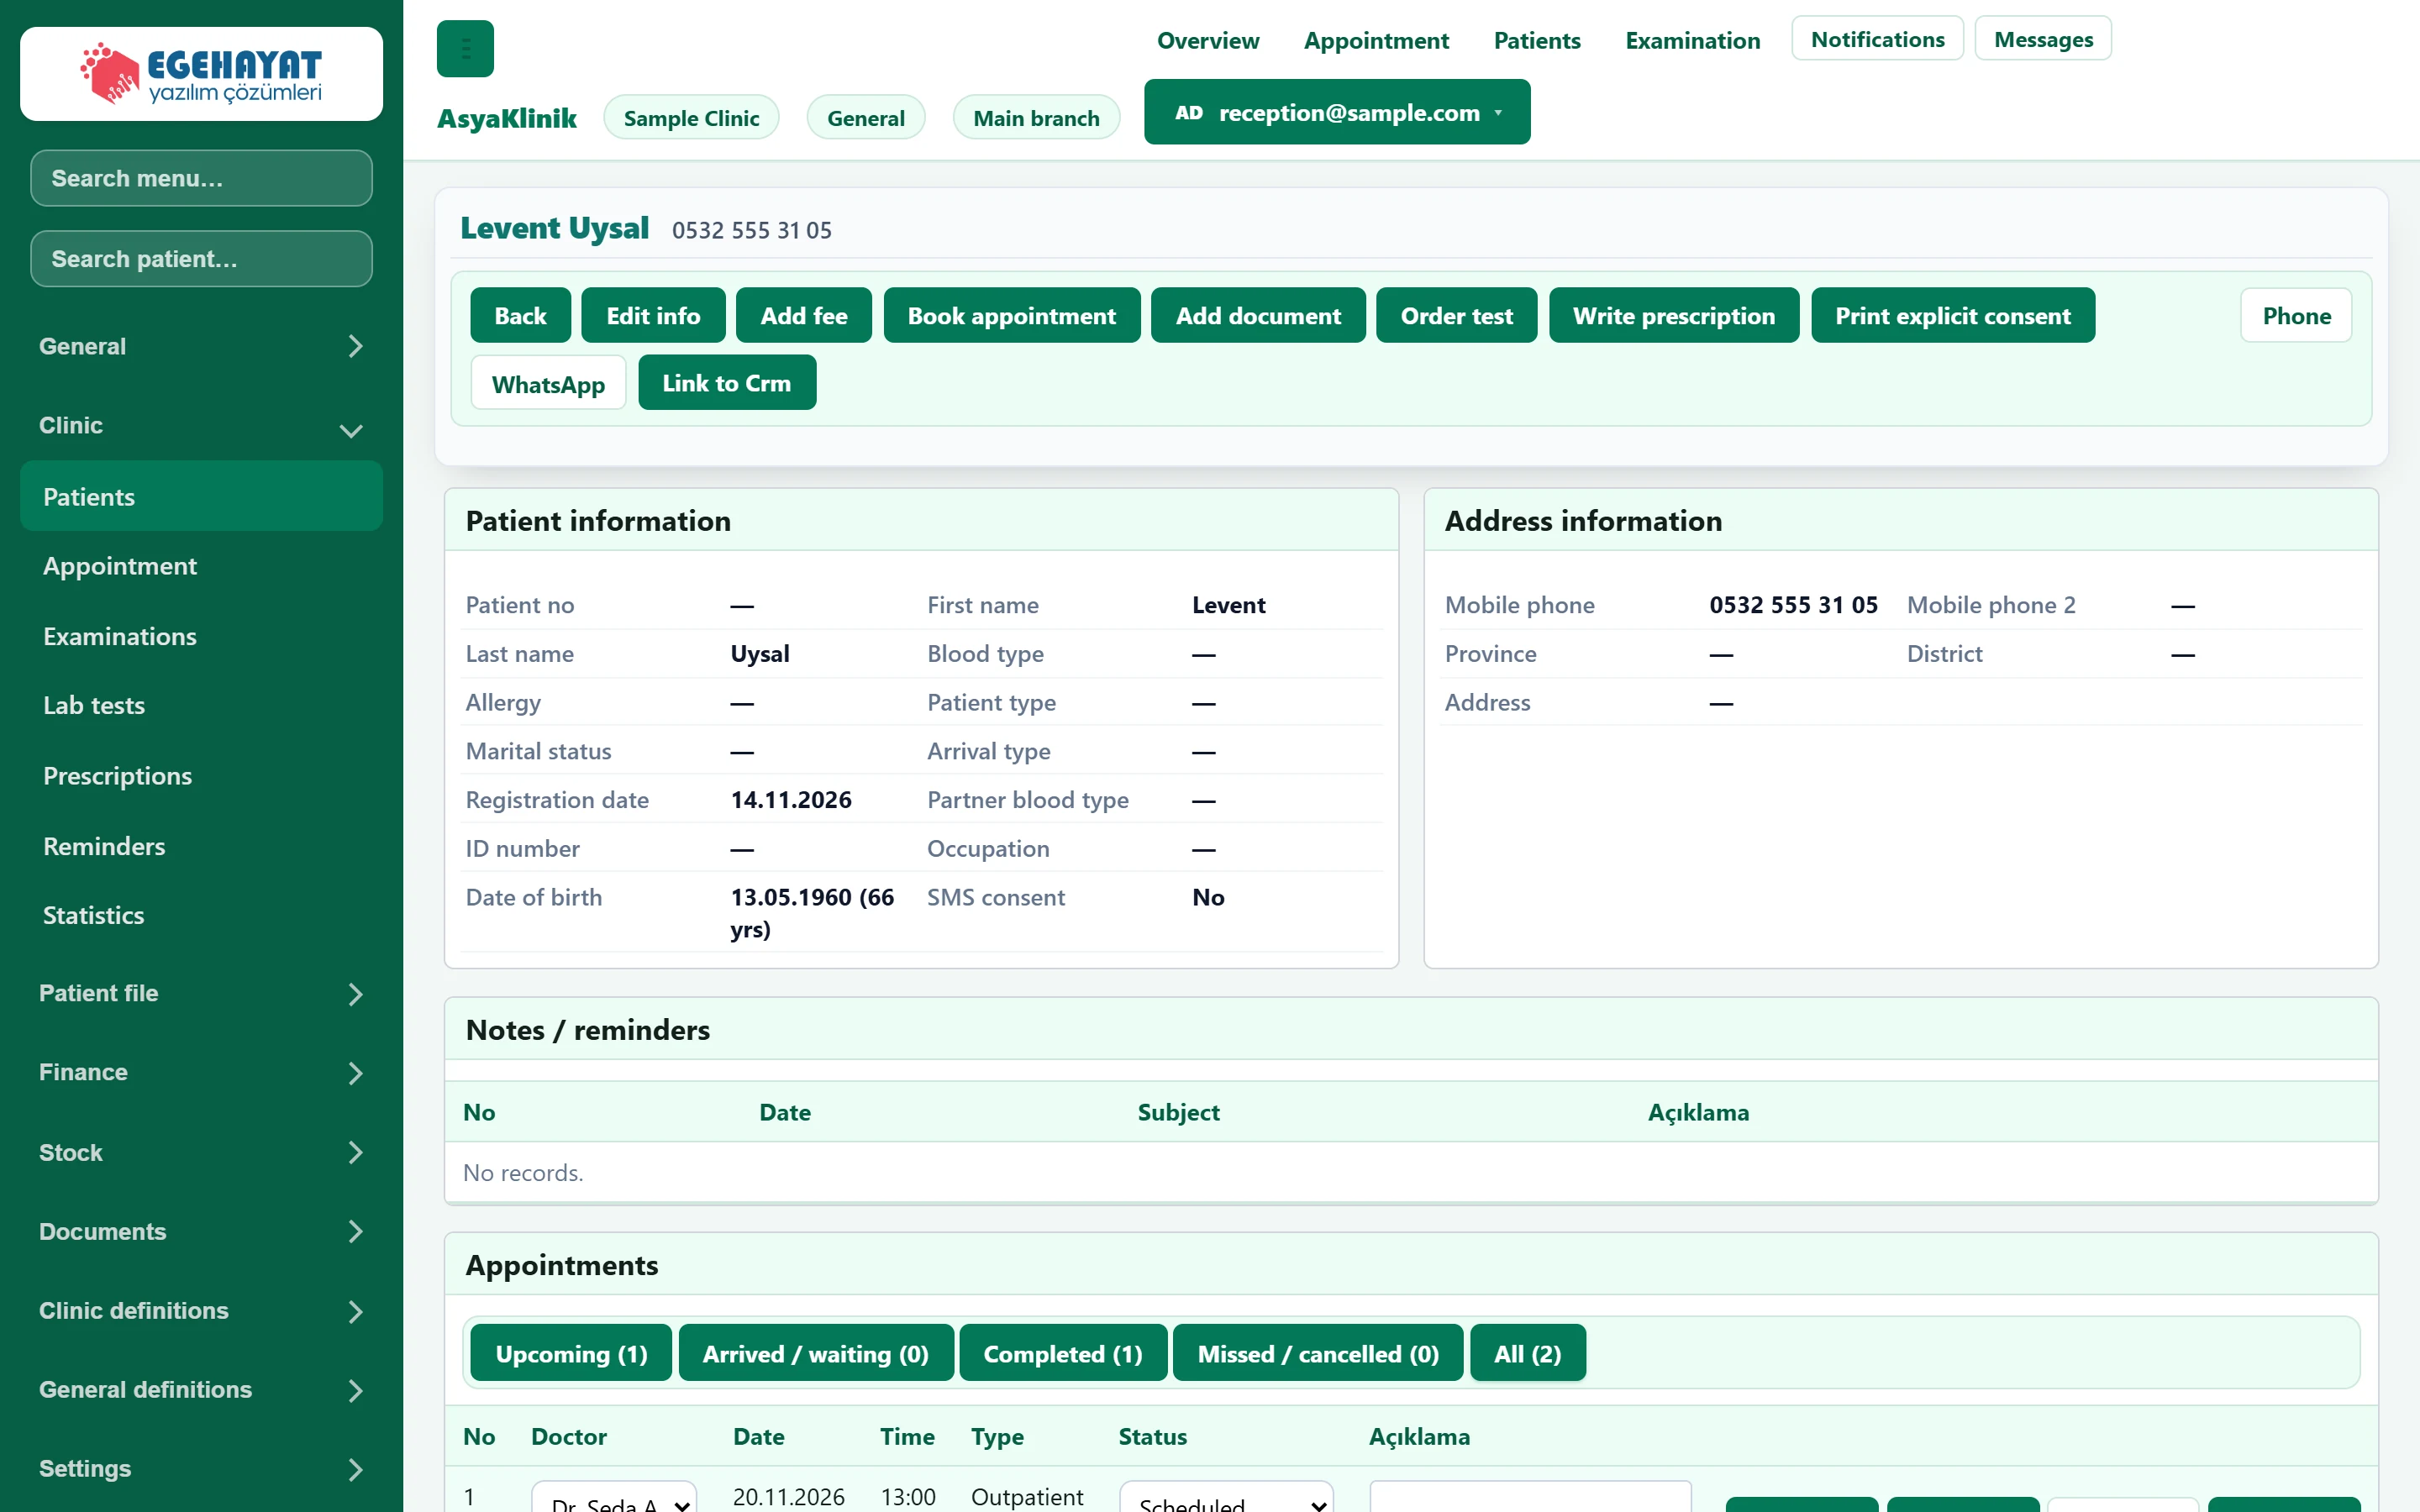
- 1Patient identity Patient name, file number and phone; stays at the top while you scroll.
- 2Action buttons Most used actions: edit data, fee, appointment, document, test, prescription, consent.
- 3Patient information Identity, blood group, allergy, referral type and SMS consent.
- 4Address information Phones and address.
- 5Appointments The patient's appointments; accept or edit them here.
Header and action buttons
The patient's name, file number, phone and blood group stay at the top while you scroll. If a critical allergy has been recorded, a red Allergy / caution warning appears below them.
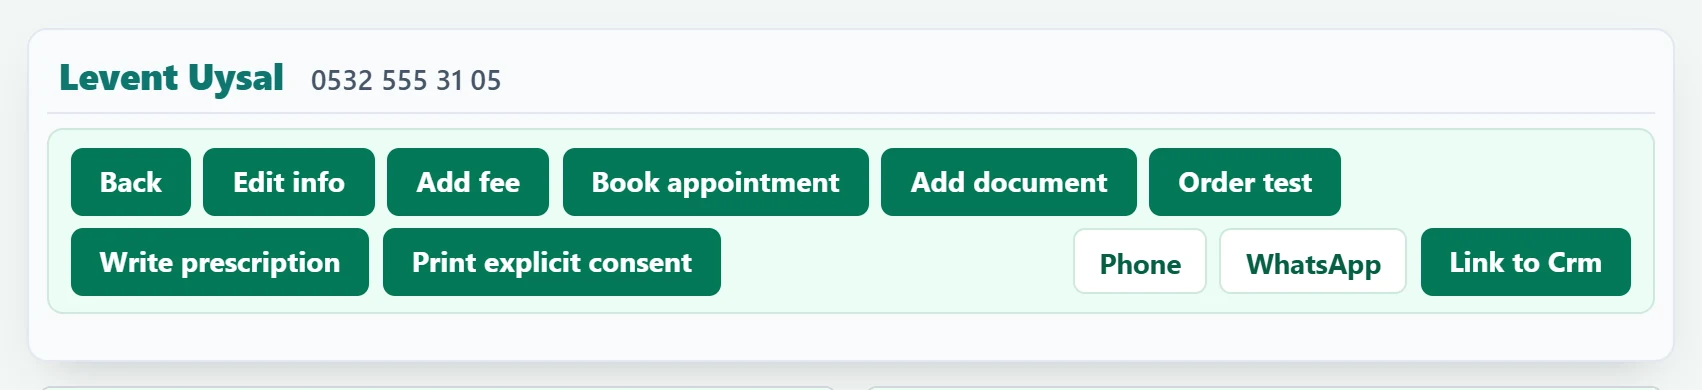
- 1Back Returns to the patient list.
- 2Edit info Opens the patient card window (same tabs as the new patient window).
- 3Add fee Charges a fee / service to the patient; can take the payment at the same time.
- 4Book appointment Books a new appointment for this patient.
- 5Add document Adds a PDF or image to the patient's file.
- 6Order test Opens the test request screen with this patient selected.
- 7Write prescription Opens the Prescriptions screen with this patient selected.
- 8Print explicit consent Prints the explicit consent text (KVKK) with the patient's data.
- 9Phone Calls by phone (opens the phone app).
- 10WhatsApp Opens a WhatsApp chat with the patient.
- 11Link to Crm Links the patient to an AsyaCrm account card.
Edit info opens the same window as new patient registration (Identity, Medical, Notes & contact tabs); see the New patient topic for its fields. The Phone and WhatsApp buttons only appear when the patient has a phone number.
Patient and address information
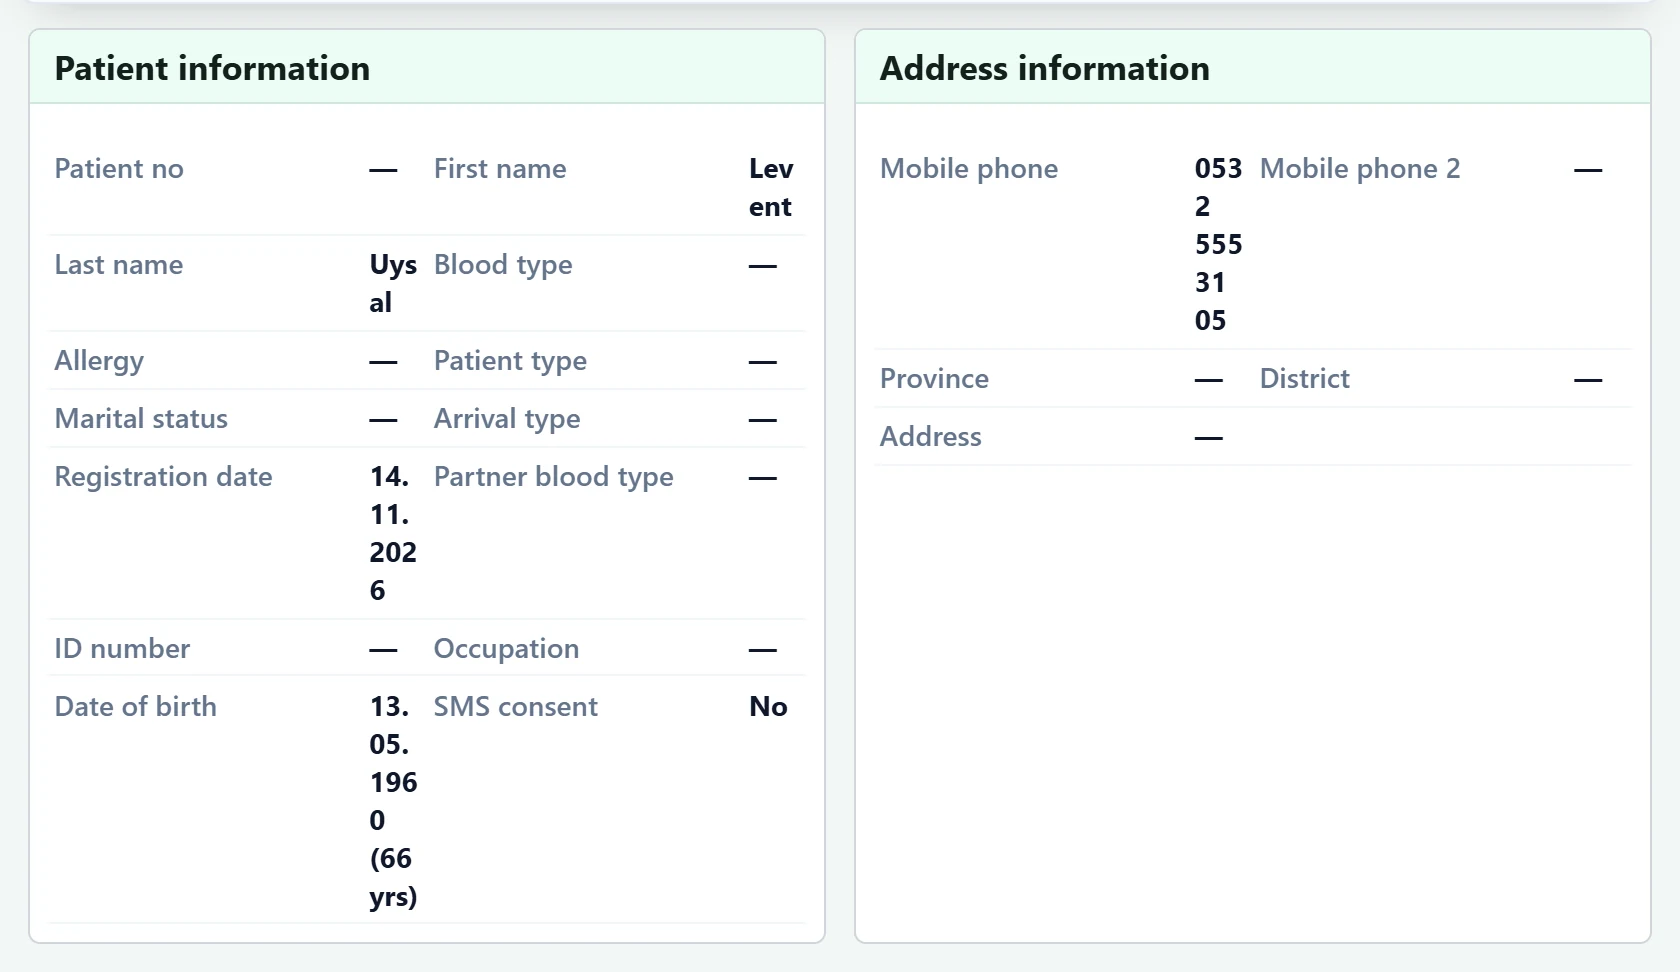
- 1Patient no The clinic's protocol / file number.
- 2Allergy Critical allergy alert; when filled, a red warning also appears at the top.
- 3Date of birth Date of birth and current age.
- 4SMS consent Consent to receive SMS messages (İYS).
- 5Address information Mobile numbers, province / district and full address.
These fields are read-only; use Edit info to change them.
Notes / reminders list

- 1Columns Reminders created for this patient: date, subject, description.
Notes created for the patient on the Reminders screen are listed here; Show opens the reminders screen for this patient.
Appointment list
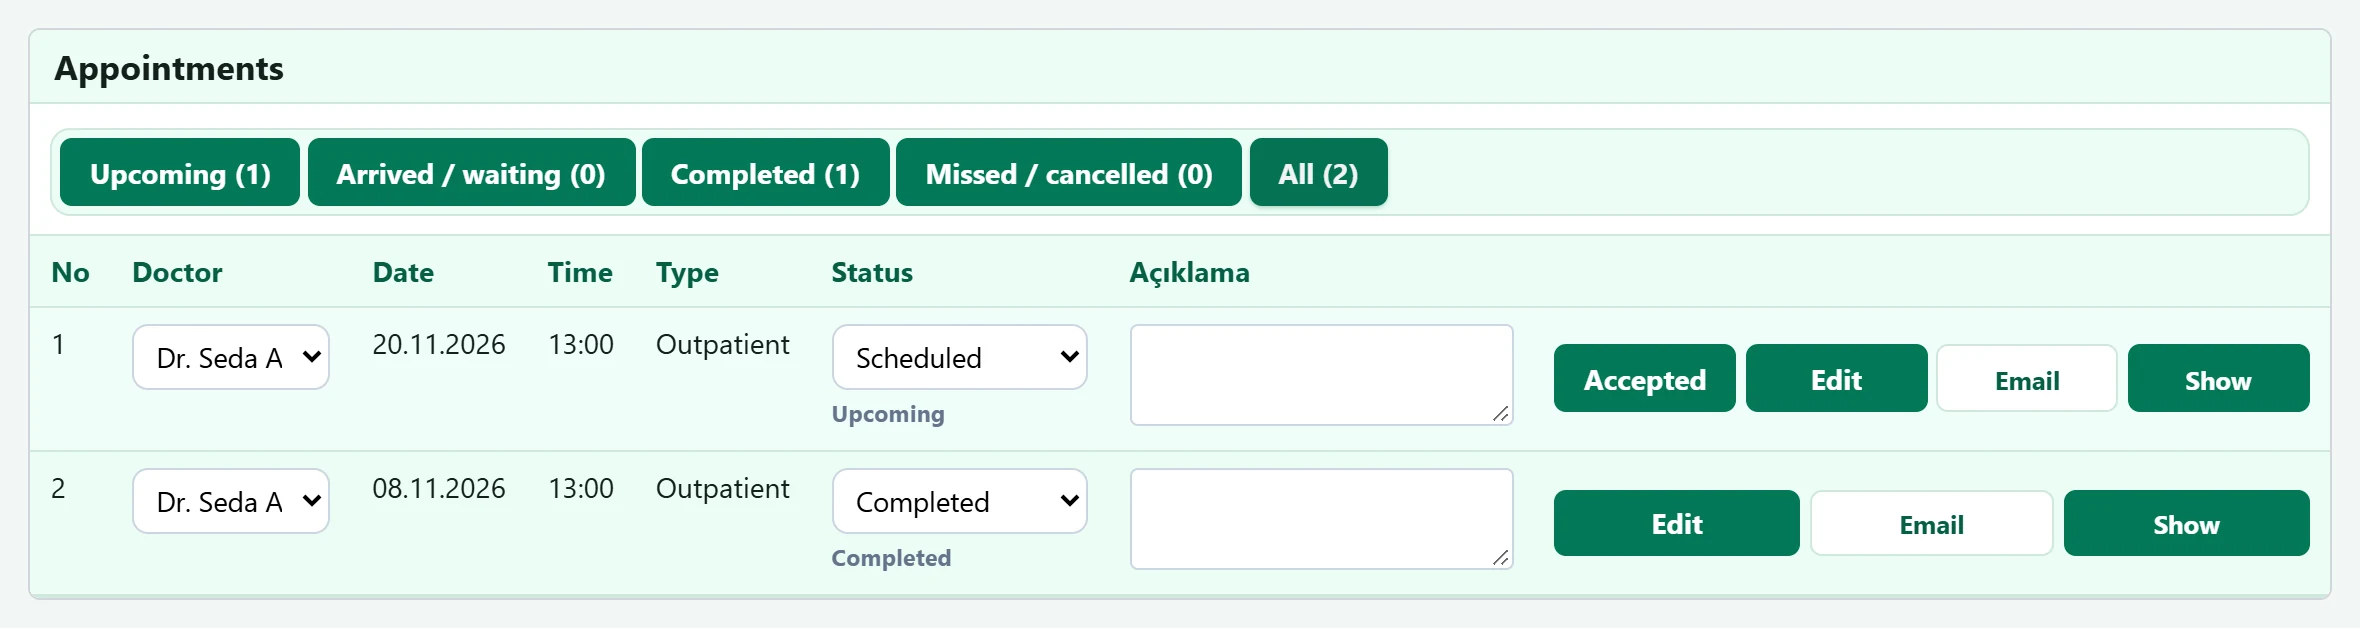
- 1Upcoming (1) Appointments after today (selected when the card opens).
- 2Arrived / waiting (0) Patients who arrived and are waiting to be admitted.
- 3Completed (1) Appointments whose examination is done.
- 4Missed / cancelled (0) Missed or cancelled appointments.
- 5All (2) All of the patient's appointments.
- 6Doctor Changing the doctor here saves immediately.
- 7Status Changing the status saves immediately; Accepted opens an examination record.
- 8Description Appointment note; saved when you leave the box.
- 9Row actions Accept / go to examination, Edit, Mail and Show.
The buttons at the top filter the list; the number in brackets is the count in that group. Changes made in the Doctor and Status lists on a row are saved immediately. To take an appointment into examination press Accepted (the accept button); an examination record is opened and the row shows Go to examination. Show opens the appointment details (Appointment details topic).
Examination list

- 1Examination result Examination result; otherwise the diagnosis, findings or complaint.
- 2Row actions Show opens the examination; Edit also appears while it is not finalized.
Prescription list
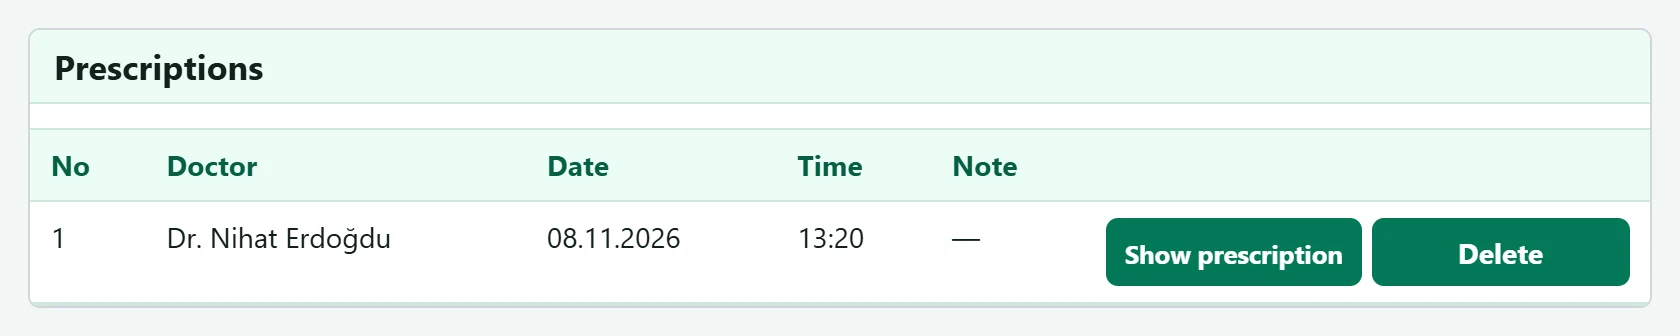
- 1Show prescription Opens the prescription; print it from there.
- 2Delete Deletes the prescription.
Account transactions

- 1Receivable Fee charged to the patient.
- 2Received Payment received.
- 3Balance Remaining debt; highlighted when above zero.
- 4Total Total of all transactions.
- 5Row actions Show, Edit (opens on the Accounts screen) and Delete.
If the patient has no account card, a No account information available warning with an Open Account Card button appears above the list; open the account card before charging fees.
Document and report lists

- 1Columns Uploaded files: date, time, description; preview with Show.

- 1Columns Files uploaded with the category Report.
Test list

- 1Requested tests Tests ordered in the same request.
- 2Show tests Opens the test request screen.
- 3Upload result Attaches the lab result (PDF / image, max 15 MB) to the request.
- 4Delete request Deletes the request.
Tests ordered together are grouped on one row. Use Upload result to attach the lab result (PDF or image) to the request; each uploaded file gets Open result and Delete result buttons.
Adding a fee
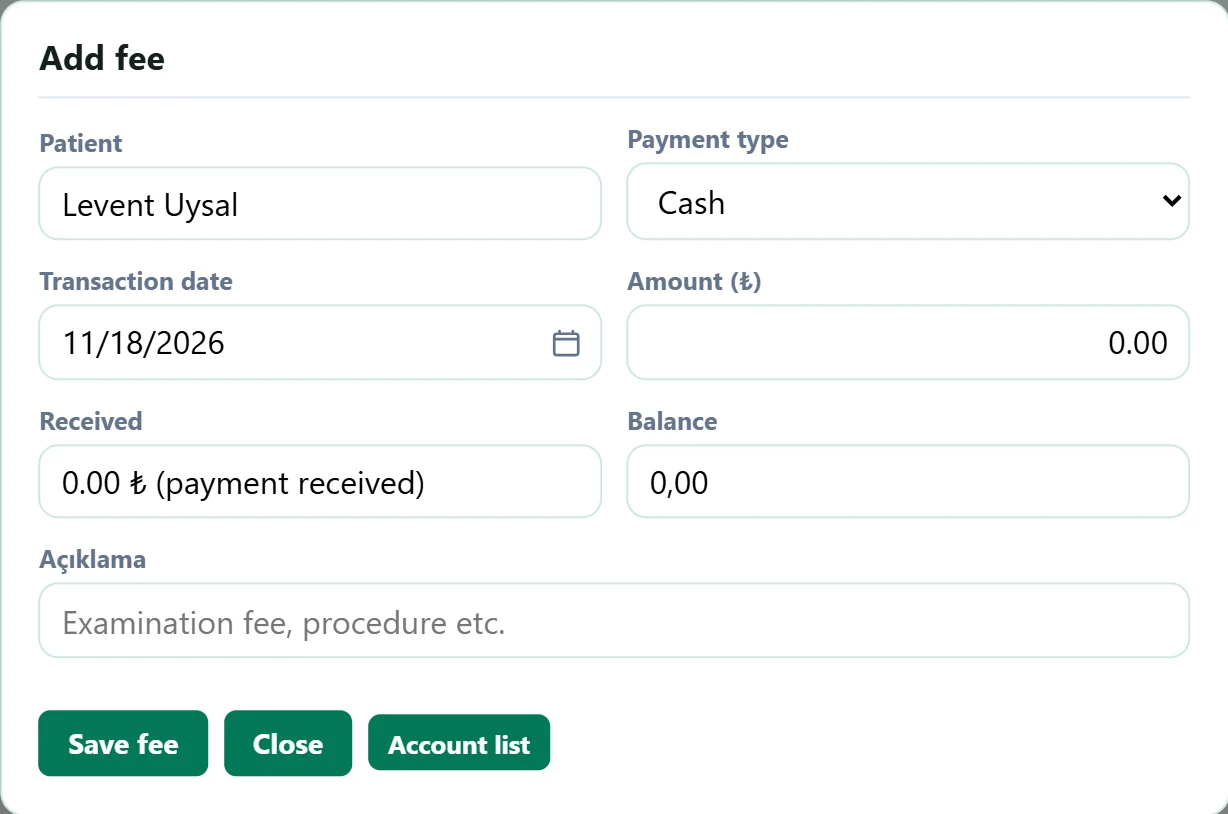
- 1Save fee Saves the fee; it goes to the account list and the service slip.
- 2Account list Opens the patient's list on the Accounts screen.
| Field | Sign in | Description |
|---|---|---|
| Patient | Text | The patient whose card is open; cannot be changed. |
| Payment type | Choice list | Cash, credit card, bank transfer, POS, other or open account. With open account the fee is recorded as debt; a partial payment can be taken. Options: Cash · Credit card · Bank transfer · POS · Other · On account |
| Transaction date | Text | Date of the fee; defaults to today. Placeholder: «mm/dd/yyyy» |
| Amount (₺) | Text | Fee amount. Except for open account, the full amount counts as paid. |
| Received | Text | Unless the method is open account, the full amount; filled in automatically. |
| Balance | Text | Remaining debt; calculated automatically. |
| Açıklama | Text | Description of the fee (e.g. examination fee). Required. Placeholder: «Examination fee, procedure etc.» |
- Press Add fee at the top.
- Choose the payment type. If the patient pays now: cash, credit card, bank transfer or POS; to record it as debt: On account.
- Enter the amount and description. On account, if the patient paid part of it, fill in Received — partial (₺) and Partial payment method; the balance is calculated automatically.
- Press Save fee. The fee is written to the account transactions and to an automatic service slip.
Which service card and VAT rate go on the service slip is set under Settings → Parameters → Patient charge / service slip.
Booking an appointment
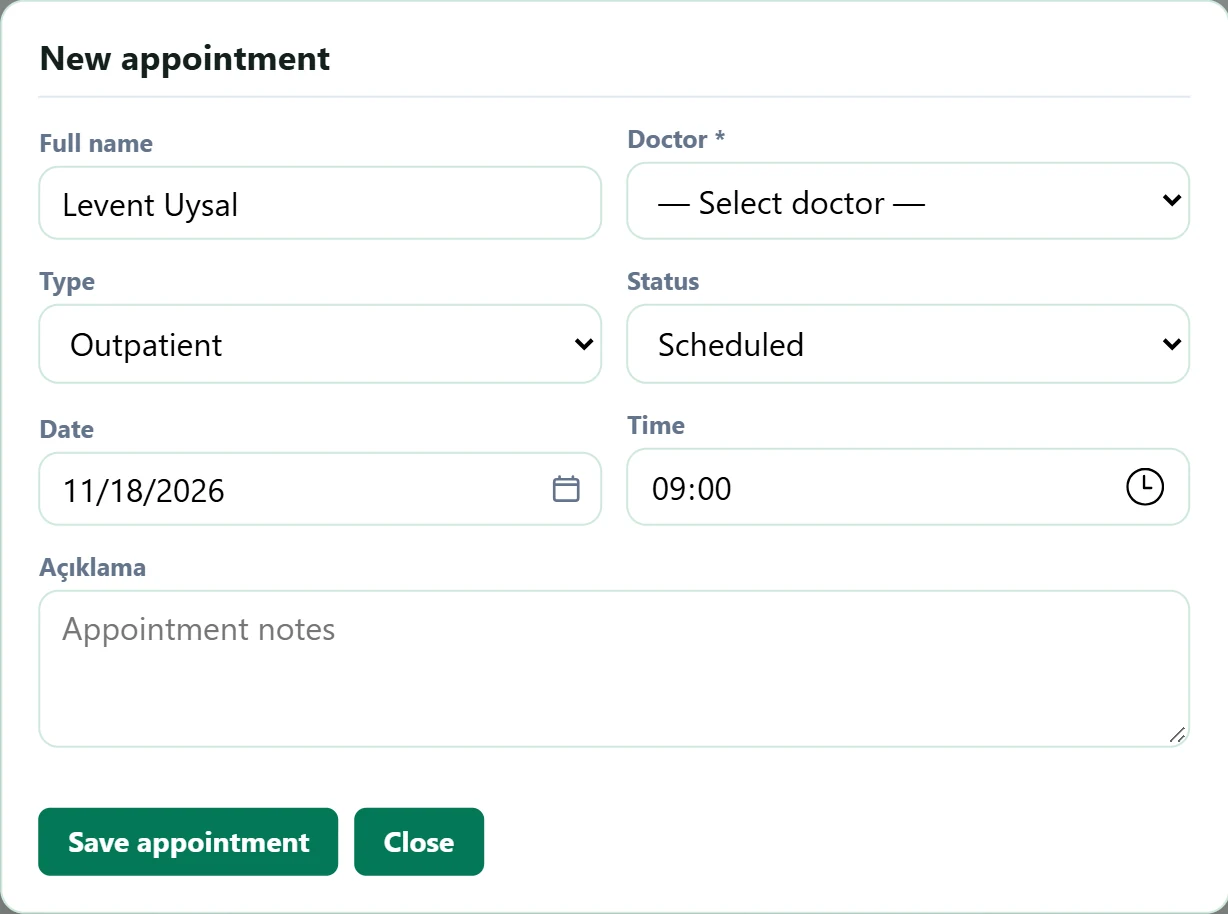
| Field | Sign in | Description |
|---|---|---|
| Full name | Text | The patient whose card is open. |
| Doctor required | Choice list | Doctor of the appointment. Required; the list comes from Definitions → Doctors. Options: — Select doctor — · Dr. Nihat Erdoğdu · Dr. Seda Akıncı · Hmş. Burcu Taner · Sek. Demo Randevu |
| Type | Choice list | Outpatient, follow-up or pre-registration. Options: Outpatient · Follow-up · Pre-registration |
| Status | Choice list | Usually Scheduled. If Accepted is chosen, the examination screen opens after saving. Options: Scheduled · Confirmed · Arrived · Accepted · Completed · No-show · Cancel |
| Date | Text | Appointment day; defaults to today. Placeholder: «mm/dd/yyyy» |
| Time | Time | Start time; the appointment is created for 15 minutes. |
| Açıklama | Long text | Appointment note (e.g. follow-up, will bring test results). Placeholder: «Appointment notes» |
If the doctor list is empty, the window shows a System › Doctors link; add doctors on the Doctors screen first. When you open an appointment with Edit on its row, the same window opens with the title Edit appointment.
Adding a document
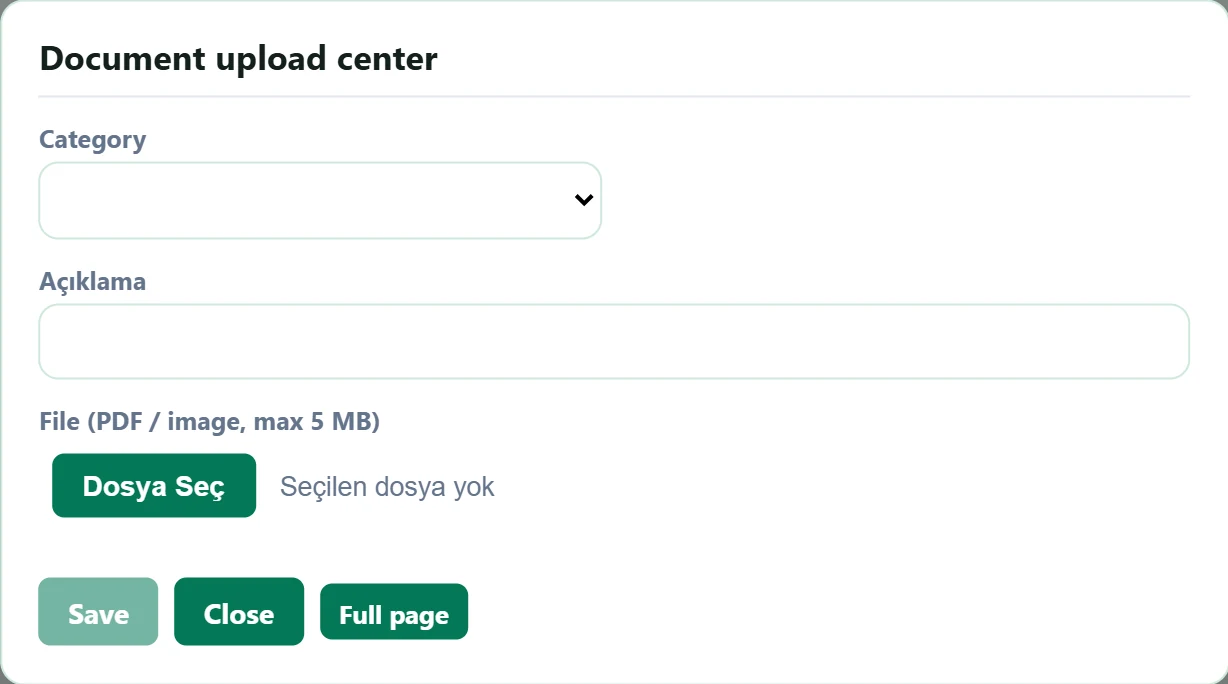
- 1Full page Opens the Documents screen with this patient selected.
| Field | Sign in | Description |
|---|---|---|
| Category | Choice list | Document or Report; files marked Report appear in the report list. Options: Document · Report |
| Açıklama | Text | Short description shown in the list. |
| File (PDF / image, max 5 MB) | Text | PDF or image file; max 5 MB. |
Linking to an AsyaCrm account
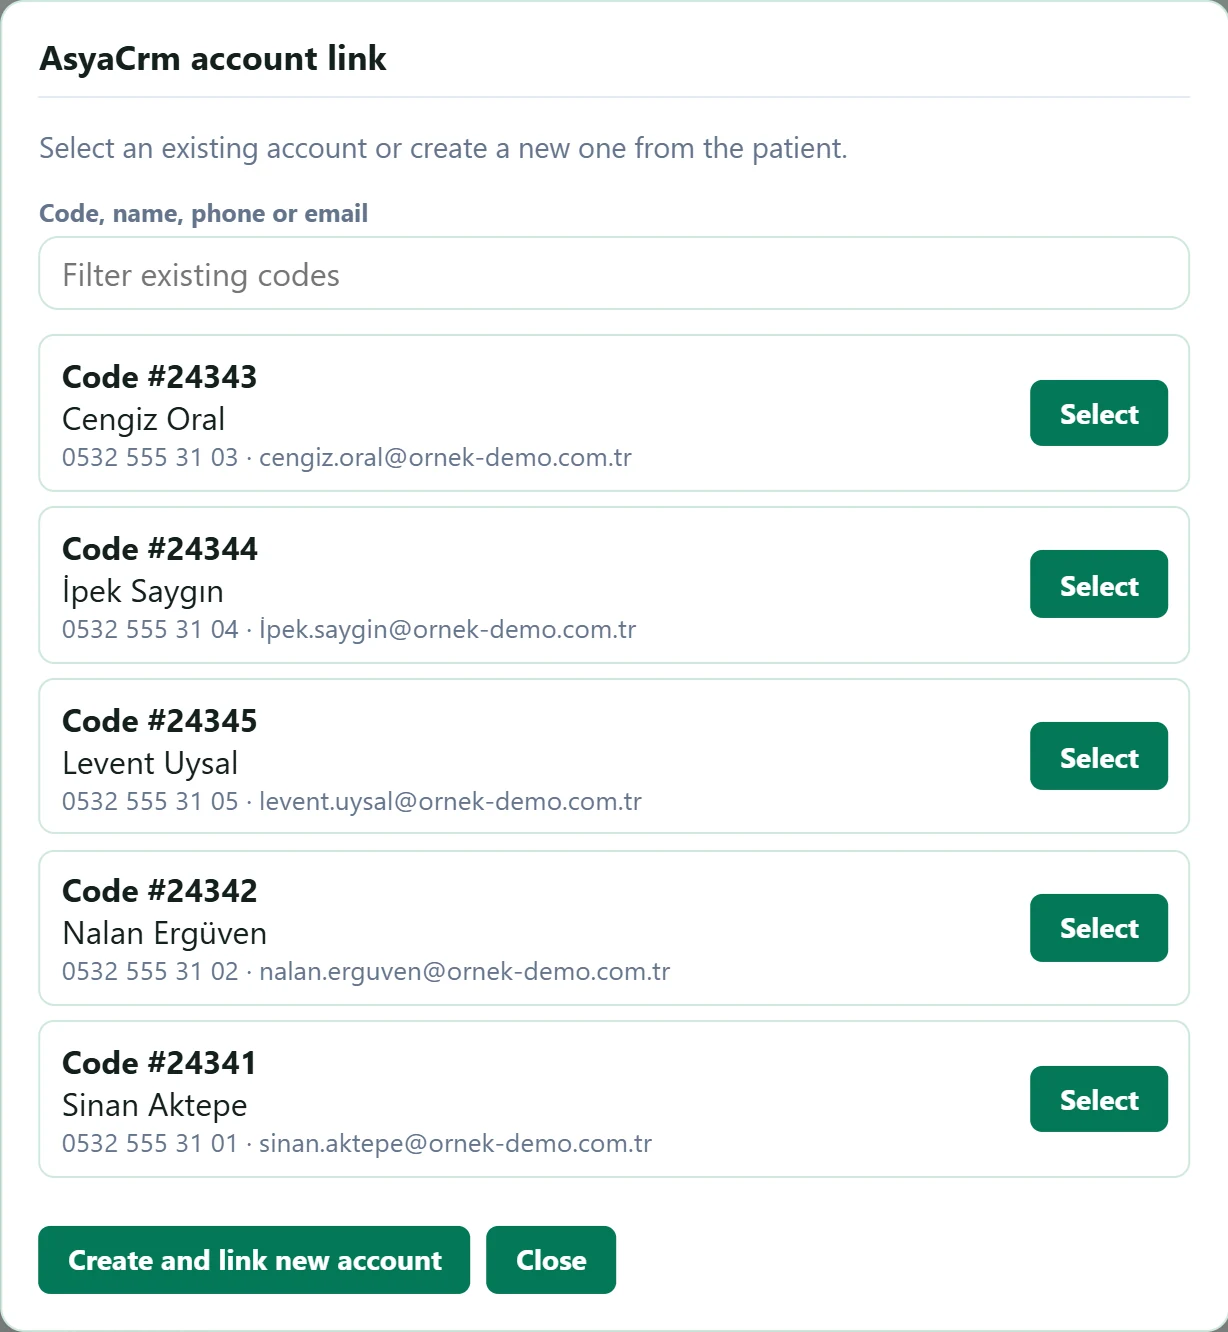
- 1Select Links the patient to this account code.
- 2Create and link new account Creates a new account from the patient's data and links it.
| Field | Sign in | Description |
|---|---|---|
| Code, name, phone or email | Text | The AsyaCrm account list filters as you type. Placeholder: «Filter existing codes» |
If the patient already exists as an account, link it with Select; otherwise use Create and link new account. The linked account is used for payments and commercial documents.
The Delete buttons on the rows (prescription, account transaction, document, test request) remove the record permanently. For a wrong fee, try Edit first.
Common warnings
| Warning | Cause | Solution |
|---|---|---|
| Description and amount are required. | The amount is zero or the description is empty in the fee window. | Enter the amount and description and save again. |
| Invalid received amount. | On account, the received amount is negative or larger than the fee. | Enter a partial amount less than or equal to the fee. |
| Selecting a doctor is required. | No doctor was chosen in the appointment window. | Choose one from the Doctor list. |
| The appointment must have a doctor. | The doctor was set to «—» in the appointment list. | Choose a doctor from the list. |
| PDF and image files only. | Another file type was chosen as a document or test result. | Upload a PDF, JPG, PNG or WEBP file. |
| File can be at most 5 MB. | The document is larger than 5 MB. | Make the file smaller and upload again (the limit for test results is 15 MB). |
| Select a file. | The document window was saved without a file. | Choose a file in the File field. |