
 AsyaTicari
 AsyaRestoran
 AsyaOtel
 AsyaCrm
 AsyaKlinik
 AsyaSpor
 AsyaSSH
 AsyaEmlak
 AsyaFilo
 AsyaPuantaj
 AsyaİSG
 AsyaİHD
 Kolay Öğren
AsyaCrm · Crm
Business Plans
The list of accounts and prospects an employee calls or meets on a day: time planning, approval and one task per row.
A business plan is the list of accounts and prospects an employee calls or meets on a given day (e.g. “morning calls”, “payment reminders”). When the plan is approved, a task of the selected activity type is created for each row. The screen appears only when the Business plans module is enabled.
Business plan list
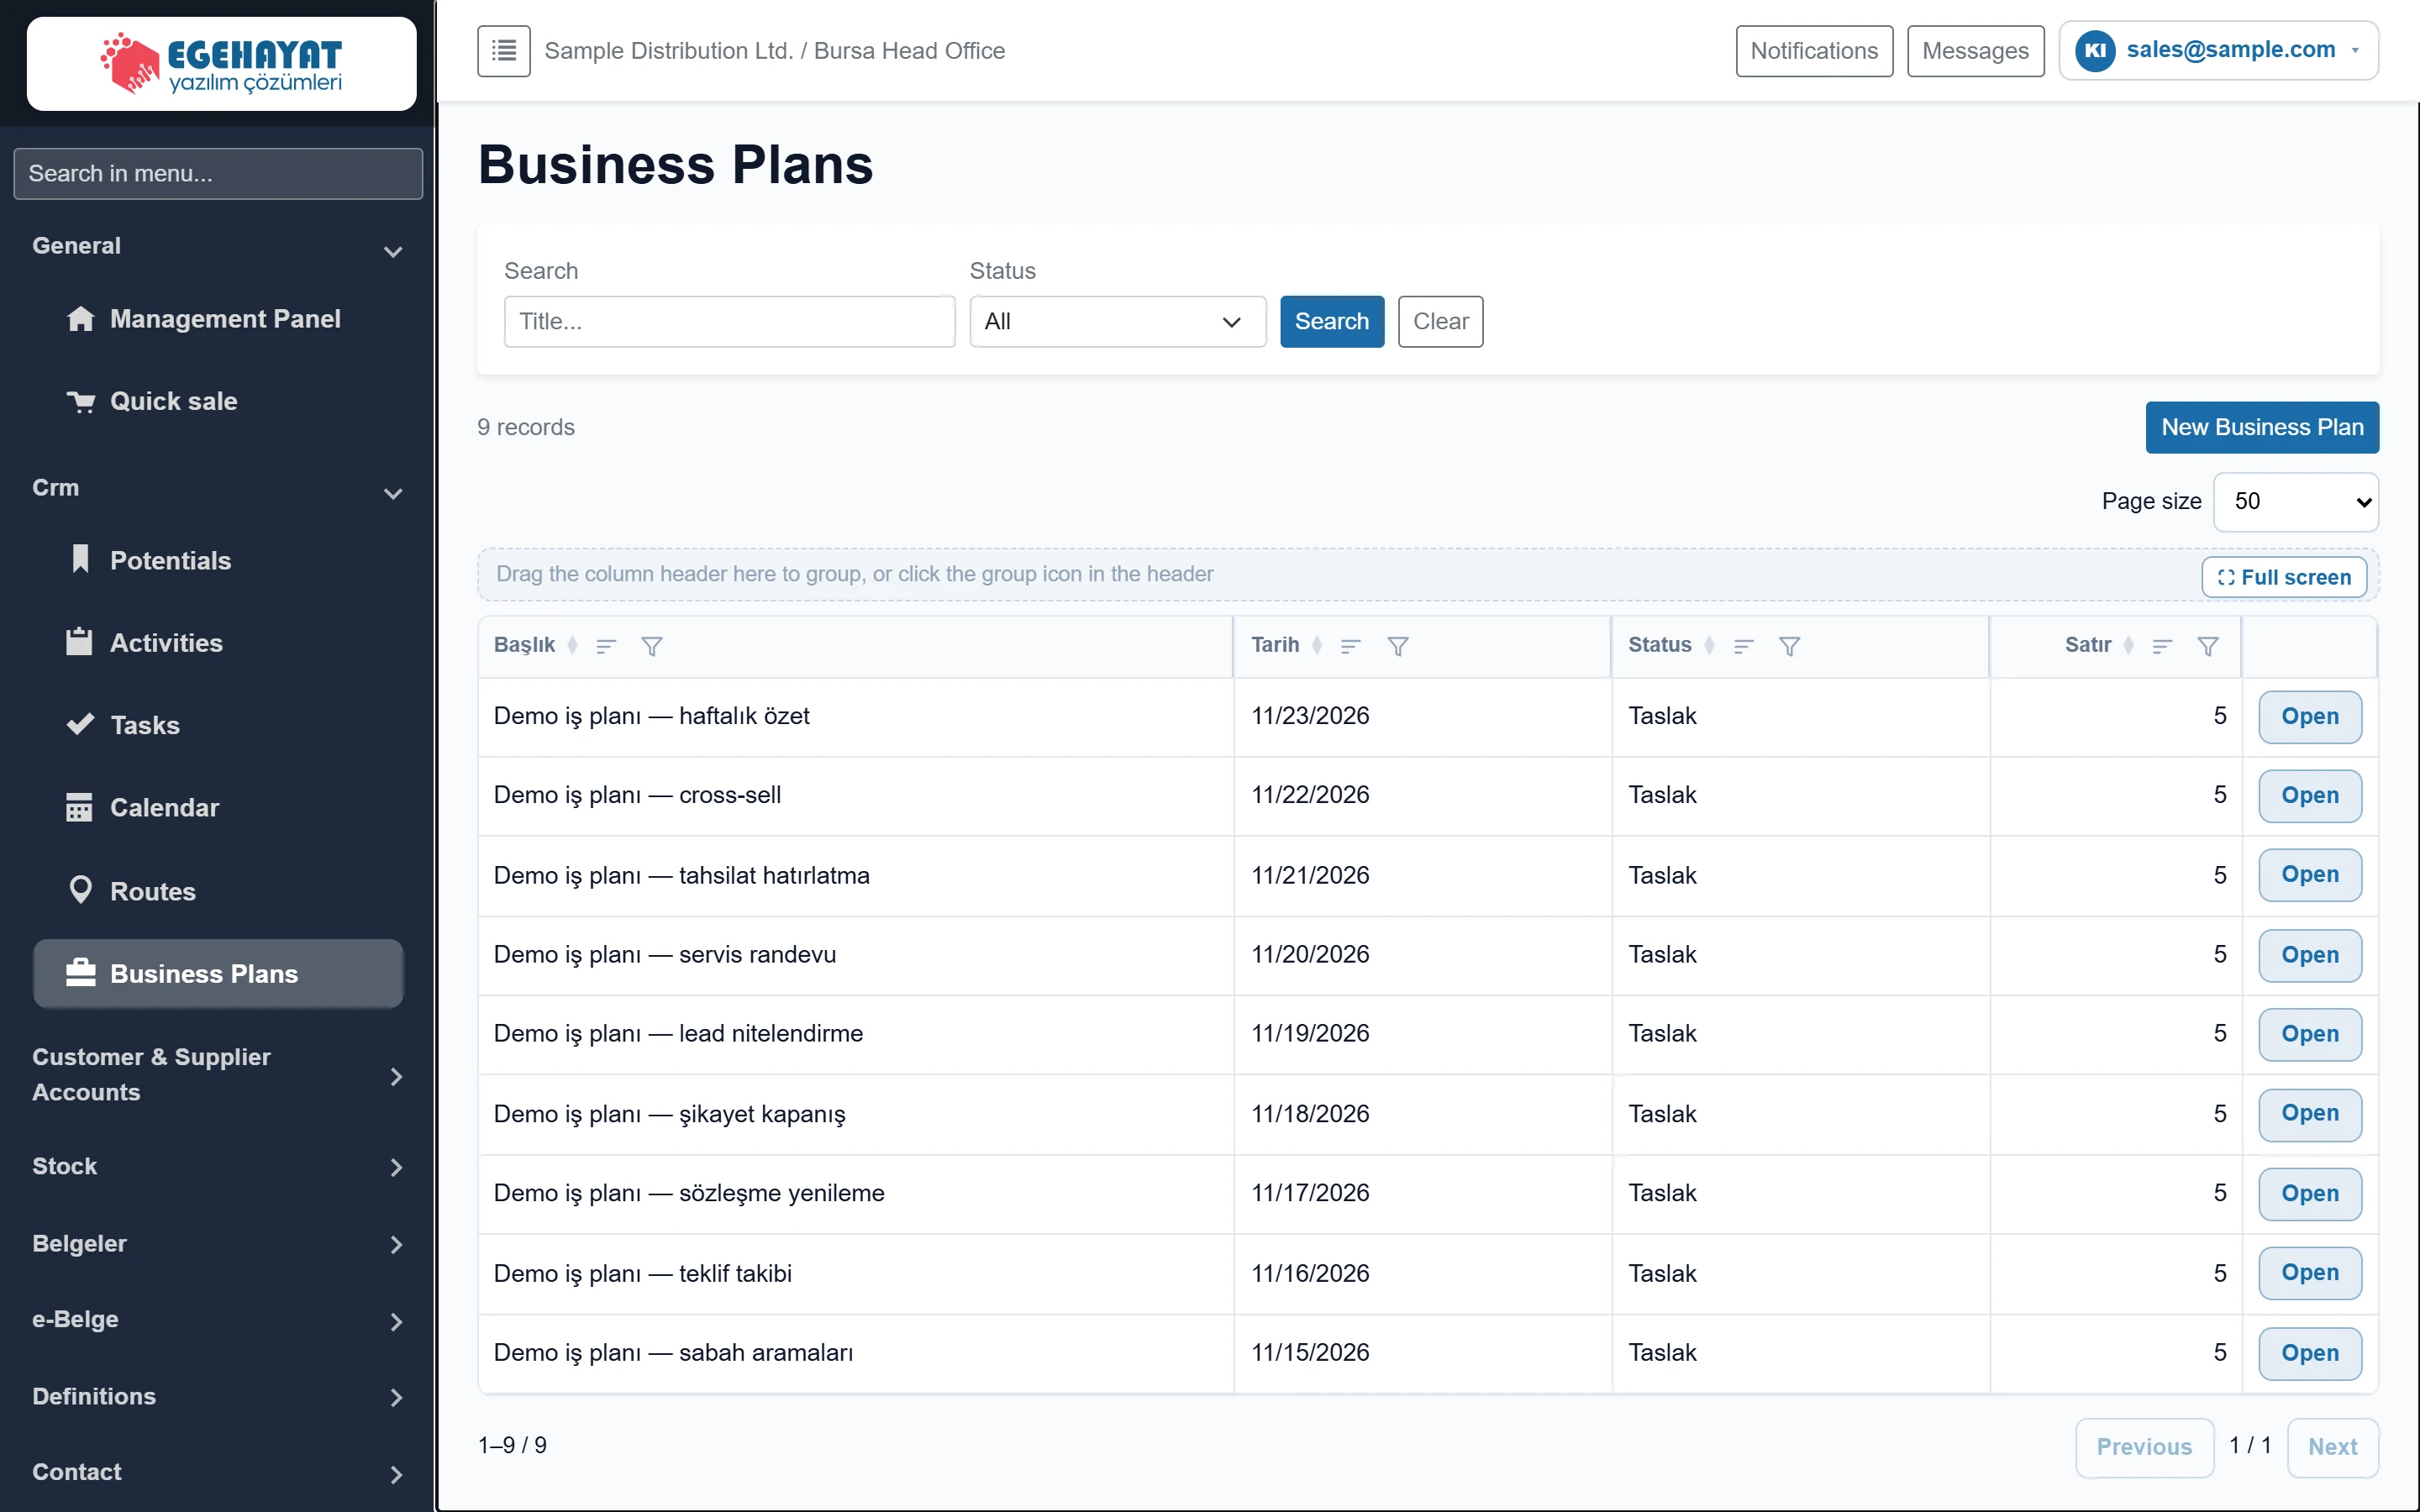
- 1Filter Search by title and status filter.
- 2New Business Plan Opens the new business plan form.
- 3Grid tools Page size, grouping and full screen.
- 4Rows Number of accounts / prospects in the plan.
- 5Open Opens the business plan form.

- 1Search Applies the filter.
- 2Clear Resets the filter.
| Field | Sign in | Description |
|---|---|---|
| Search | Text | Part of the plan title; the list narrows as you type. Placeholder: «Title...» |
| Status | Choice list | Shows Draft, Pending approval, Approved or Cancelled plans separately; All shows every plan. Options: All · Taslak · Onay bekliyor · Onaylı · İptal |
The list is sorted by plan date. Rows shows the number of records in the plan. Click Open to open a plan, or New Business Plan to create one.
Business plan form
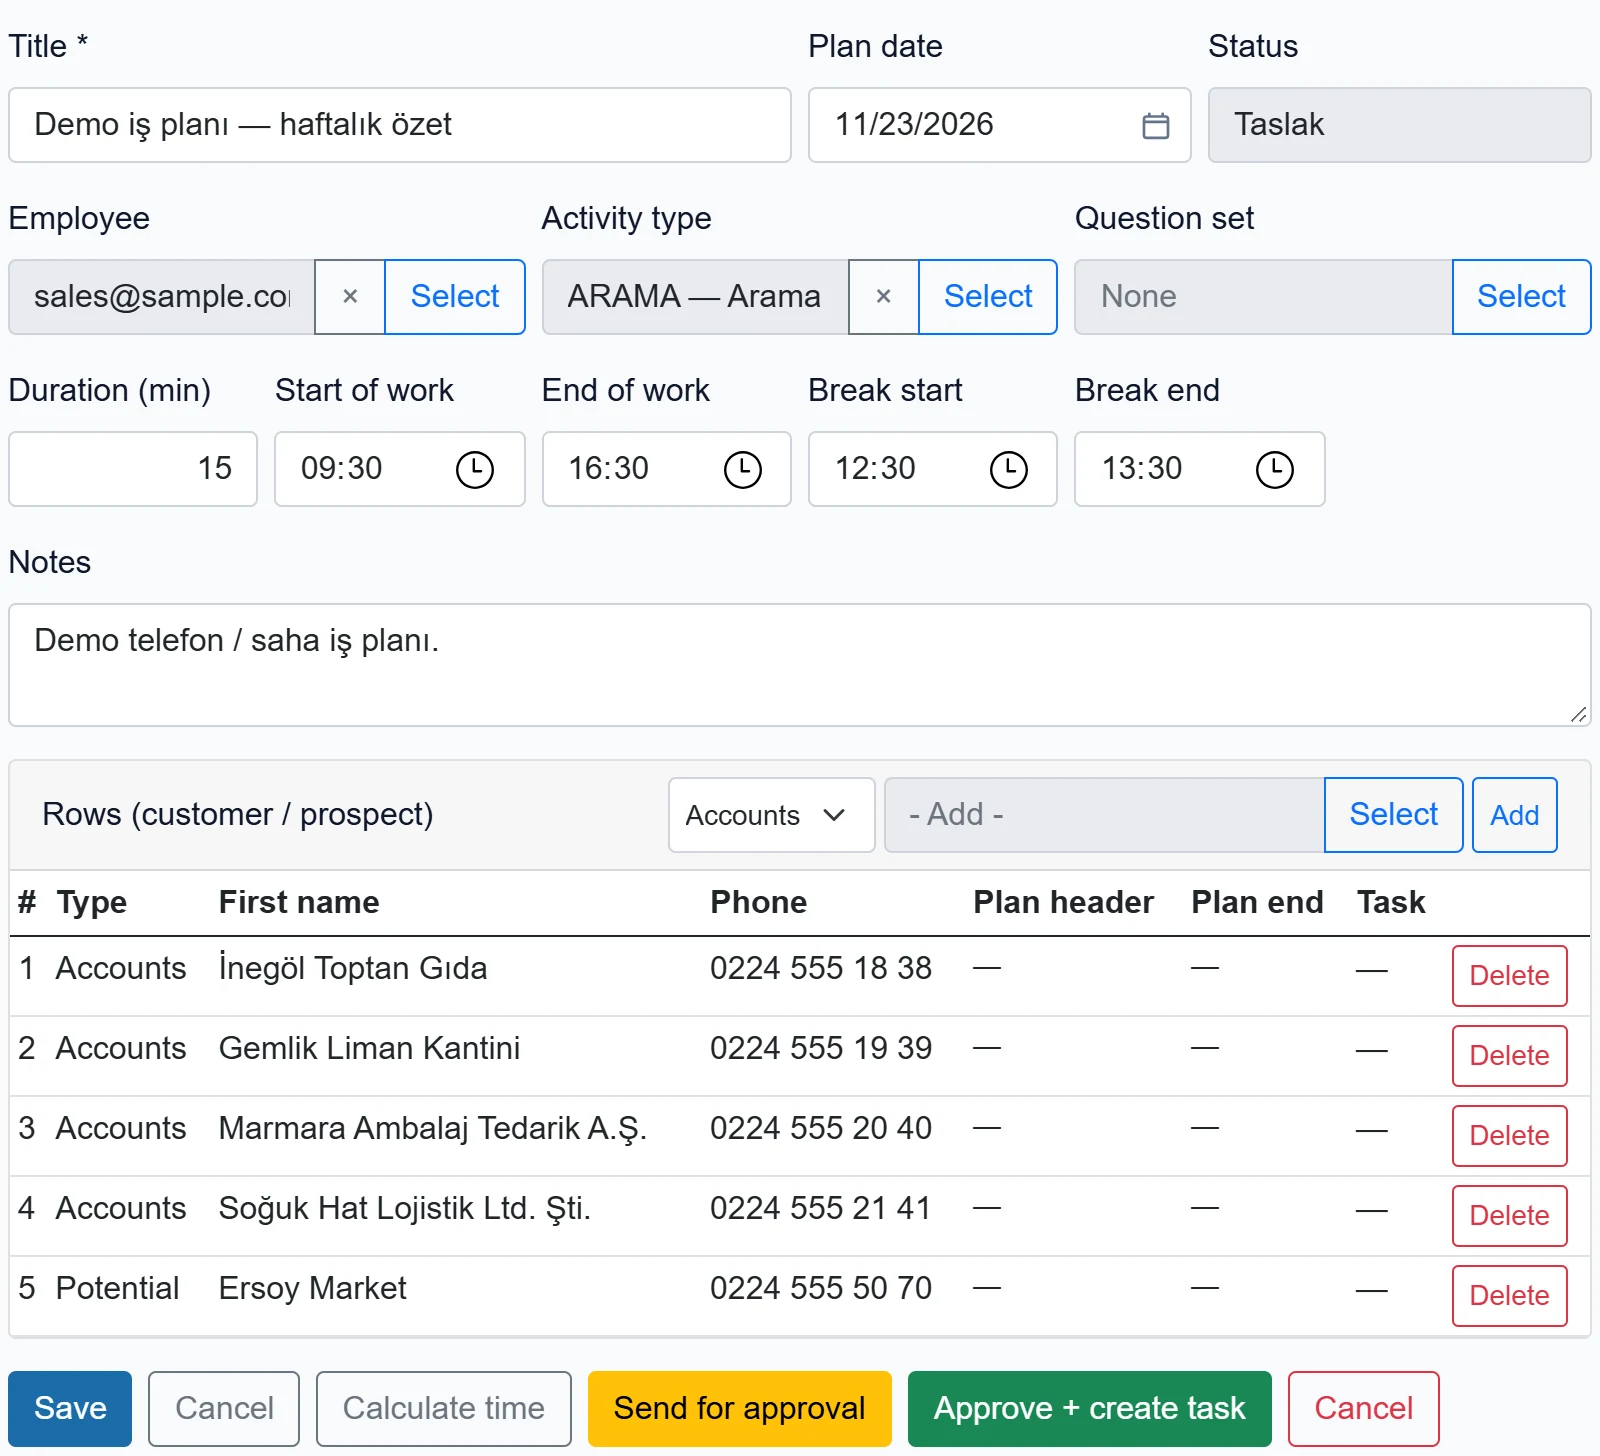
- 1Status Status of the plan; not edited by hand.
- 2Selection fields Employee, activity type and question set; type and pick from the list.
- 3Times Duration, working hours and break used by the time calculation.
- 4Save Saves the plan.
- 5Calculate time Assigns times to the rows based on working hours, break and duration.
- 6Send for approval Sends the draft for approval.
- 7Approve + create task Approves and creates a task for each row.
- 8Cancel Cancels the plan.
| Field | Sign in | Description |
|---|---|---|
| Title required | Text | Name of the plan (e.g. “Morning calls”). Required, up to 200 characters. |
| Plan date | Text | Day on which the calls / visits take place. Placeholder: «mm/dd/yyyy» |
| Status | Text | Read-only; changed by the Send for approval, Approve and Cancel buttons. |
| Employee | Text | User who carries out the plan. Required to send for approval and to approve. Placeholder: «— Select —» |
| Activity type | Text | Type of the tasks to create (e.g. Call). Comes from type definitions. Placeholder: «— Select —» |
| Question set | Text | Checklist to fill in when closing the task (optional). Placeholder: «None» |
| Duration (min) | Text | Time allowed per row; used by the time calculation. |
| Start of work | Time | Earliest start time of the first row of the day. |
| End of work | Time | Time by which the last row must end. |
| Break start | Time | No rows are scheduled in this interval. |
| Break end | Time | End of the break. |
| Notes | Long text | Free-text note on the plan. |
In the Employee, Activity type and Question set boxes, Select opens the search window and × clears the choice.
Rows (customer / prospect)
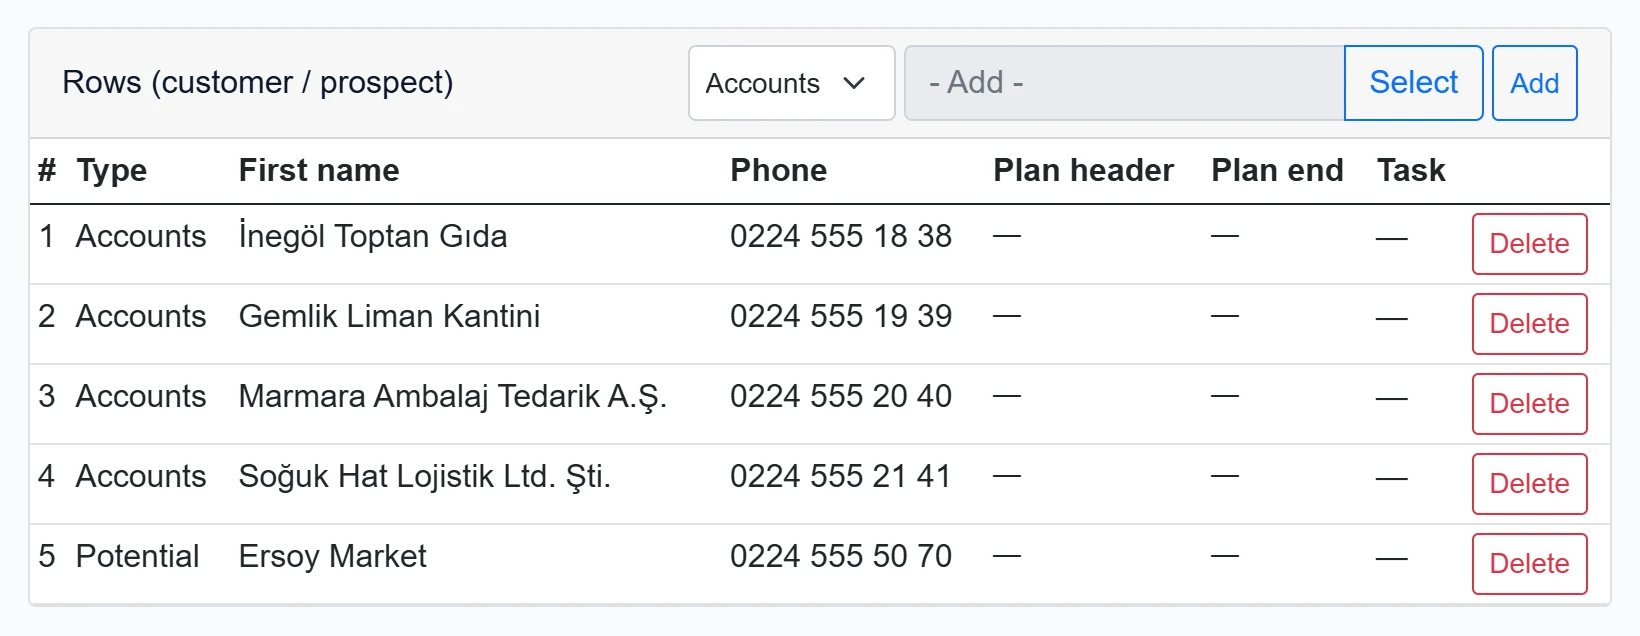
- 1Row type Whether the row to add is an account or a prospect.
- 2Select record Type a name and select.
- 3Select Adds the selected record; the same record cannot be added twice.
- 4Planned start Planned start, filled by Calculate time.
- 5Task Number of the task created for the row.
- 6Delete Removes the row (becomes permanent on Save).
- Choose account or prospect in the header list.
- Find the record with Select, then click Add. The same record cannot be added twice.
- Remove a row with Delete and click Save.
The phone number is the card value at the time the row was added. Planned start / end are filled by Calculate time, Task when tasks are created.
Step by step: approving the plan and creating tasks
- Enter title, date, employee and activity type, add the rows and click Save.
- Calculate time: rows get times starting at the working start, spaced by Duration (min); the break is skipped.
- Send for approval: the plan becomes “Pending approval”.
- Approve + create task: the plan becomes “Approved” and a task is created for each row (“Approved and tasks created.”). If times were not calculated, they are calculated now.
- If you add rows to an approved plan later, Create Tasks creates tasks only for rows without one.
To have a checklist filled in when the task is closed, select a Question set; answers appear under Reports → Checklist.
Cancel sets the plan to “Cancelled” and also cancels the tasks created from it; there is no undo.
Common messages
| Message | Cause | Solution |
|---|---|---|
| Personel seçilmelidir. | No employee when sending / approving. | Select a user under Employee. |
| En az bir satır eklenmelidir. | The plan is empty. | Add rows and send again. |
| Bu durumdaki plan onaya gönderilemez. | The plan is Approved or Cancelled. | Such plans cannot be sent again; create a new plan if needed. |
| Görev üretmek için plan onaylı olmalıdır. | Creating tasks for an unapproved plan. | Use Approve + create task first. |
| Are you sure you want to cancel the task? | Cancel was clicked (the text means the plan). | OK cancels the plan. |
The first four messages come from the server and are currently shown in Turkish in every interface language.